The better you move off the mat, the better you’re going to move on the mat.
I’ve been saying that for years, and after four decades of gymnastics, judo, and BJJ, I believe it more than ever.
 Your techniques live or die on how well your body handles the spaces between them: the weight shifts, the level changes, the twists out of bad spots. You can drill technique with a partner.
The raw movement underneath it? That’s yours to train anytime, anywhere, no partner and no gi required.
Here’s a story about why this matters.
A couple of years ago, a visiting brown belt with zero body control fell awkwardly on me during warm-up drilling. Just drilling! He basically banana-splitted me, tore my groin, and put me off the mats for six months.
You can’t always control your training partners. What you can control is how well your own body moves, and that’s the best insurance policy you’ll ever have in this sport.
So today I’m sharing the solo BJJ drills I use and teach: a three-move hip mobility flow, a core coordination drill, and level change practice to smooth out your transitions.
Here’s what we’ll cover:
- How these drills make your jiu jitsu better
- The 3-move hip mobility flow
- The core coordination drill
- Level changes: solo grappling practice
- How to fit these into your training week
How Solo Drills Make Your Jiu Jitsu Better
The way I think about grappling comes down to three things: posture, breath, and mindset. You control your posture so you can maintain your breath and keep a positive mindset. Meanwhile, you’re working to break your opponent’s posture, take their breath, and send them down that downward spiral instead.
Every drill in this article serves that. The better your range of motion and control, the quicker you can recover your posture when someone’s trying to take it from you, get your breath back, and get back to work.
And there’s a simpler payoff too. Most people who start BJJ are strong enough. What they’re missing is the ability to use their body when someone’s loaded on top of them: the range of motion, the coordination, the smooth transitions. That’s exactly what solo movement work builds.
I went deeper on this whole approach on the Chewjitsu podcast if you want the full conversation. For now, let’s get moving.
The 3-Move Hip Mobility Flow for BJJ
Good hip mobility is key for every part of your BJJ game: throwing, attacking, escaping, even butt scooting if that’s your thing. And here’s something I get asked all the time by fellow jiu jitsu practitioners: “Ryan, my back hurts. What should I do?”
Work on your hip mobility. Looser hips mean less back pain, and less pain means better jujutsu.
These three movements are the 80/20 of hip mobility for BJJ, and they chain together into a flow you can run before and after you train.
1. The 90/90 Hip Switch
- Sit with your front leg bent at 90 degrees in front of you and your back leg bent at 90 degrees to the side. That’s the 90/90. Depending on your mobility, you may need to pull your front foot closer to you, and that’s fine.
- Turn slightly so your chest is over your front thigh, with both hands on the floor beside your leg.
- Keep your chest up and pulse toward your end range 5 times, then hold for 20-30 seconds.
- Instead of trying to force your chest to your thigh, focus on pulling your belly button forward. That takes you deeper into the stretch.
- To switch sides, keep your feet in place, bring your knees up, and let them drop to the floor on the opposite side. If your butt doesn’t reach the floor on the other side, don’t worry about it. The last thing we want is to force something and injure ourselves.
- Pulse 5 times and hold 20-30 seconds on that side too.
The switch itself is worth playing with on its own. Going back and forth between sides builds the rotational hip control you use every time you turn through a pass or recover guard.
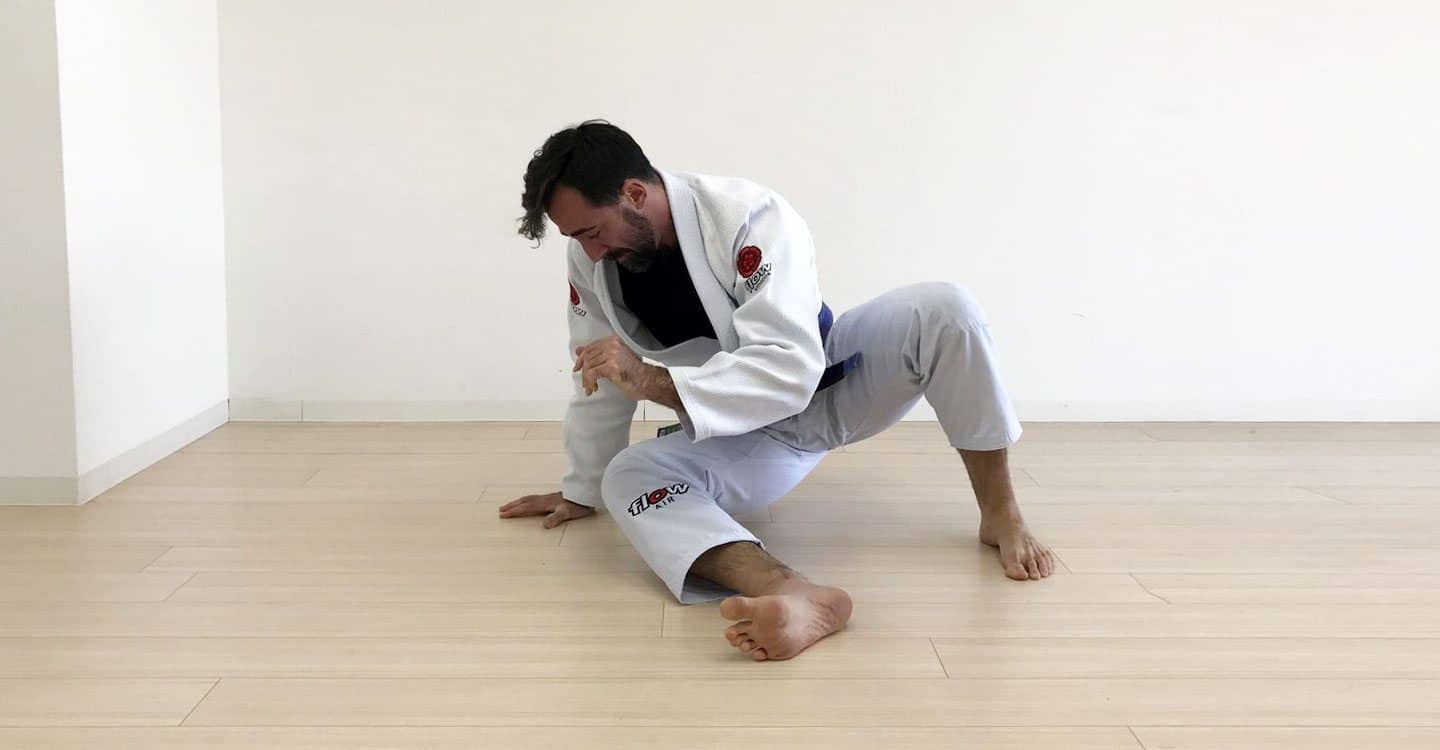
2. The Kneeling Lunge
- From your 90/90, bring your front knee up over your foot and use your hands to pop up into a kneeling lunge. This transition is part of the training, so don’t rush it.
- Set up with your knee over your ankle, your hip over your back knee, and your rear toes tucked.
- Now squeeze your butt as tight as you can. That tilts your pelvis, and you’ll feel the stretch run from your quad and hip flexor up toward your core.
- With your chest up, pulse forward 5 times. These are small movements, and that’s the point. The glute squeeze keeps you safe and keeps you from overdoing it.
- Hold for 20-30 seconds, back out, and repeat.
- To go deeper: raise the same-side arm overhead and pulse into the stretch. Add a slight side bend and you’ll feel it all the way through your lats while opening the hip flexor even more.
Tight hip flexors are what make your posture collapse when you’re tired. This is the antidote.
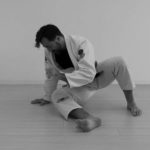
3. The Modified Twisting Bear
- From your kneeling lunge (let’s say your left leg is forward), place your right hand on the floor, extend your right leg behind you, and twist your chest open by dropping your right heel toward the floor.
- Go easy. This one is tough, and you’re really going to feel it in the hips.
- Pulse by dropping your hips toward the floor 5 times, then hold for 20-30 seconds with your chest up.
- If you can’t keep the back leg straight, bend it and put the knee on the ground. That’s a perfectly safe position to work from while you build up.
Twisting is everywhere in jiu jitsu. When someone’s on top of you and you have to twist out, you want your body to already know that range so you don’t mess yourself up. That’s what we’re after here.
Putting the Flow Together
Once you know the three movements, chain them: 90/90 on one side, switch to the other side, transition up into the kneeling lunge, flow into the twisting bear, then come back through and run the opposite side.
The transitions between movements aren’t filler. Moving in and out of positions is its own skill, and it’s one you use in every single roll. Bring awareness to how you’re moving, not just whether you hit the stretch. Are you getting a little bit better each day? That’s really all that matters.
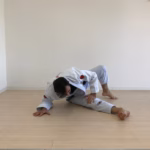
The Core Coordination Drill
This is one of my favorite core moves, and it’s also really good for training your brain, because it’s a little confusing. It looks simple, but a lot of people struggle with the coordination at first. If you’ve ever fumbled a drill like this during warm-ups in your BJJ class while everyone else cruised down the mat, this is how you fix it.
Break it into three stages:
Stage 1: Lower body.
- Sit with your head and feet off the ground, back rounded, hands on the floor.
- Lift your hips off the floor and move them side to side.
- Play with the variables: legs straight or toes pushed toward the ceiling. Hands hovering off the floor. Both arms held to one side while your hips keep moving. Then switch arm sides.
- Holding your breath? Don’t. The easiest fix is to simply smile.
Stage 2: Upper body.
- Put your feet on the ground and swing your upper body side to side.
- Add a twist, looking further to each side.
- Pull your shoulders up off the ground as your arms swing. Reaching for the ceiling helps you get higher.
- Once that’s comfortable, bend your arms and keep the side-to-side motion going.
Stage 3: Put it together.
- Load your arms to one side, then pull your hips up and across as you swing your arms over your body.
- Return to the loaded position and repeat. Gradually it gets easier to move your hips as your arms come back across.
- Straight arms are easier at first. Later, work on relaxing them and keeping them close to your body.
If you find yourself rotating off line instead of traveling straight, that just means your upper and lower body aren’t coordinating yet. Make the movements much, much smaller until you’re tracking straight, then build the size and speed back up. Pretty soon things click, and before you know it you’re going up and down the mat.
This kind of combination work, where you chain movements and sharpen the link between your upper and lower body, is exactly what our Sequences program is built around, if you find you enjoy it. And you will. It’s fun as hell.
Level Changes: Solo Grappling Practice
This last set isn’t a technique tutorial. It’s something better: practicing movements similar to your techniques so that when you land in those in-between positions, where you might be compromised in strength, flexibility, or control, your body already owns them. Done right, it becomes a form of solo grappling.
I think about three ranges.
Standing. Step one leg high, find your balance, then let the foot slide to the ground as you drop and sit into it. Once that’s easy, sophisticate it: keep the foot high longer, drop and twist out to one side, then the other. You’re building the single-leg balance, ankle strength, and hip control that make your sweeps and trips actually work when you finally drill the technique itself.
Mid-range. Think squat height. A simple example is the leg drag pattern: from your squat, pull the leg across, shift your weight, and move into whatever comes next. What you’re really practicing is loading one side of your body so the other side is free to move. That weight transfer is in every pass you’ll ever hit.
Floor. From the squat, address the floor: sit through, shift side to side, roll, twist, and come back up. Don’t think of these as techniques. Think of them as transitions, and explore as many ways in and out as you can. The question you’re answering is simple: how well do you move when nobody’s trying to crush you? Because if the answer is “not great,” it doesn’t get better with 90 kilos of pressure on your chest.
Move from top range to mid to floor and back up, in as many patterns as you can find. Once you start seeing the patterns, techniques pop out of them on their own: threading the leg for back control, framing up out of bottom positions, all of it.
There are a lot of flashy techniques out there. But let’s be honest: when you’re actually rolling, it’s not the flashy stuff you hit. It’s basics. And these transitions are what make your basics better.
How to Fit These Drills Into Your Training Week
Here’s how I’d plug these in:
Before class: run the 3-move hip flow as your warm-up. It takes about five minutes and gets your hips, spine, and balance switched on before live rounds.
After class: run the hip flow again, slower, with longer holds. Your back will thank you.
Off days: spend 10-15 minutes on the coordination drill and level changes. This is play, so treat it like play. Explore, go slow, and don’t grind.
My rule for all of it: make it so easy it would be stupid not to do it. Five minutes you actually do beats the 45-minute routine you skip.
And if you want the stretching-focused companion to these drills, my BJJ mobility routine covers the five areas that take the most abuse on the mats: wrists, hips, shoulders, neck, and ankles.
Build the Base These Drills Sit On
Everything in this article works better when your body has a foundation of strength, flexibility, and control to draw from. That’s what Elements builds. You’ll work through animal-style movements with specific progressions and clear benchmarks, training force, range, and skill through the same positions grappling puts you in: deep hips, loaded shoulders and wrists, and constant transitions.
Better movement off the mat. Better jiu jitsu on it. That’s really all there is to it.
Move Better Off the Mats, Roll Better On Them
With Elements, you’ll build the strength, mobility, and body control that every drill in this article draws on. Short sessions at home, no equipment, clear progressions.


Hi, I'm Ryan Hurst 👋
After a training accident ended his competitive gymnastics career, Ryan moved to Japan, where he spent close to 30 years training and competing in judo, kendo, and other martial arts until another injury made him rethink what training is for.
As Head Coach, he leads program design and teaches every week on our YouTube channel. His book, Stay On The Mat Forever, is aimed at helping you keep training for decades. He loves handstands, dogs, and hiking.