 Have a job? A car? A couch?
Congratulations!
Your hips are probably as tight as Mick Jagger’s pants.
But you’re in good company because it’s the same for pretty much everyone these days.
Poor hip mobility can contribute to issues like lower back pain, knee problems… and it makes squats and other common movement patterns more difficult.
Your hips are the center of movement for your body, so the healthier and less restricted your hips become, the more potential your body has for strength, power, and athleticism.
That’s why I made the hip stretching sequence I’ll show you below.
Here’s an overview of what you’ll find below:
1. Hip Mobility Routine
2. How the Routine Works
3. If you’re super-stiff…
4. Original Hip Routine
5. Hip Mobility Exercises
6. Your Hip Mobility Plan
7. Recommended Programs
8. Massive Hip Mobility FAQ
9. Why Hip Mobility Matters
10. How to Get Started
You can also download this full routine to use anytime.
What follows will loosen your hips, which means less pain and better performance in virtually everything you do.
Mobility Flow Routine for Relaxed, Open Hips
Loosening up tight hips is an important and nuanced topic, so this is a very long article.
But you’ll be happy to learn that this doesn’t need to be complicated. In fact, everything you really need to enjoy greater range of motion in your hips is in this short video:
Need the beginner version? Hip routine for stiff people 🙂
If you do nothing else but gently and consistently practice the movements in this video a few times a week, you’ll definitely notice greater mobility and fewer aches and pains due to stiffness.
But you probably notice that this doesn’t look like the stretching exercises you’re familiar with…
And that’s where things get interesting…
🆓 Download this Tutorial Video & Cheatsheet
You’ll wanna use these routines often, so grab a copy to keep on your device and refer back to later.
What We’ve Learned from Helping over 125,000 Clients Increase Their Range of Motion
The original GMB hip mobility routine is by far our most popular piece of content, so you might be wondering why we’d mess with a good thing…
![]()
But since posting that video in 2014, we’ve kept learning.
As you can see in the video above, our current approach is based on whole body movements rather than the static stretches you’re probably used to seeing.
Let’s look at why that is…
Mobility Movements Beat Isolated Stretching Exercises
Life isn’t one-dimensional.
The whole reason you don’t wanna be stiff in the first place is that your body needs to move through different positions and ranges all day.
In fact, sitting still is one of the main things that contributes to stiffness in the first place. So why would we rely solely on static exercises to fix it?
Don’t get me wrong: static exercises have their place. But they work far better when combined with movement exercises like those shown above.

With our clients, we make heavy use of locomotion exercises, which simply means “crawling” movement patterns.
Moving with intention, reaching, and striding in a variety of locomotion movement patterns pulls together all of the specific ranges of motion in these hip exercises. And in a much more fun and engaging way than just staying in one place!
This is what we built into our programs, which have been used by tens of thousands of clients.

Already lifting, running, climbing, doing martial arts, or otherwise training regularly? GMB Mobility is the focused option to add the mobility component to whatever you’re already doing.
Super Stiff? Tight Hip Flexors? Try These Beginner Hip Mobility Stretches
Since we spend so much time sitting, tight hip flexors are extremely common these days, and that can make a few of these exercises uncomfortable for many people.
Even if you have very tight hips, there are ways you can gently stretch at your own level.
In this video, you’ll learn some stretches that can be done sitting in a chair, with your feet elevated on either a low stool (easier) or another chair (a bit more challenging). Feel free to use any chairs, bench, or stool you have around your house.
🔬 Need More Detail? Further down in the article, I’ll give you detailed explanations of each of these exercises.
You’re NOT Too Tight for Stretching!
I know many people who feel that they are “too tight” to even begin stretching. And while we’ve always said to make as many adjustments as needed, or skip exercises that felt out of reach, we wanted to show some variations of these hip stretches for anyone who’s particularly tight and feeling intimidated by stretching.
Avoiding stretching because you’re stiff is like avoiding the light switch because it’s dark.
Everyone starts somewhere.
If you want to improve your hip mobility and function, just start wherever you can. Work consistently. In time, you’ll start to see the needle moving in the right direction.
The Original GMB Hip Mobility Routine: 8 Daily Hip Mobility Exercises
If you’re short on space or want to work more deeply on a particular range of motion, the exercises in our original routine may still be useful.
You can see the contrast from the movement-focused routine right away.
These exercises are generally isolating a set of specific muscles and movements instead of coordinating the whole body together. That’s less effective for overall movement ability, but it can also help address specific mobility concerns, which is why we’ve kept it here.

Detailed Hip Stretch Instructions
While most people will get more out of the movement-focused mobility routine, this section will give you detailed instructions on the specific stretches – both the original and beginner versions – so you can be confident that you’re performing them correctly if you need them.
👉 Download a cheatsheet covering each of the 8 moves
1. Lying Hip Rotations
 This exercise starts the sequence as an easy first movement to warm-up and build toward the rest of the series.
Key Points:
- Lie on back with both knees bent.
- Cross one ankle over the opposite knee.
- Move in and out of the stretch by rotating the hip in and out.
- For the hold, use your hand for assistance to press into the knee.
Beginner Version: Sitting on chair or bench, elevate your legs on to a stool or chair (the higher the surface, the more challenging it will be), and externally rotate one leg at a time. Then, play around with crossing one ankle over the other leg and externally rotating from that position. You can have the bottom leg bent fully, or straightened a bit more.
2. Piriformis Stretch
 This stretch targets the piriformis (hence the name!), which is a small muscle located deep in the buttock. This muscle tends to get pretty tight from sitting all day.
Key Points:
- Cross one leg fully over the opposite leg, so your knee is crossed over your thigh.
- Pull the crossed knee toward your opposite shoulder, stretching the piriformis muscle.
Beginner Version: Sit on a chair with your leg bent (as much or as little as needed for your comfort) on a stool or chair, then cross your other leg over the bent leg. Rotate your chest toward your knee, pulling your body toward your crossed knee. If it is too difficult to do this with one leg crossed over the other, you can just elevate one leg onto a stool or chair and do the same motion.
3. Butterfly Hip Stretch
 This classic stretch is very useful for the groin muscles, and for improving hip rotation to the side. Pay close attention to your back and keep it straight and upright as you move through the stretch.
Key Points:
- Sit up with feet together, moving the knees down toward the ground.
- Use your hand to press into the ground and move your groin closer to your heels.
Beginner Version: Sitting on a chair, lift your legs on to an elevated surface. Put your feet together, with your knees splayed outward. The key, as you move in and out of the stretch, is to keep your chest up and lean forward as you draw your knees downward.
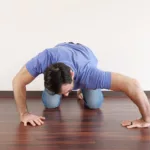
4. Frog Hip Stretch
 At this point in the sequence, we are ready for a bit more intensive stretching for the hips, adding some more weight bearing into the exercise.
Again, take it slow and easy and don’t force a range of motion you may not be ready to achieve. The action here as you move in and out of a stretch is squeezing the knees together as you rock backward and relaxing as you rock forward. After a few repetitions you can sit back and relax into the stretch for upwards of a minute.
Key Points:
- Start on hands and knees, bringing your knees as far apart as is comfortable.
- Rock back and forth in that position.
- Keep the balls of your feet on the ground, with toes pointed outward.
Beginner Version: Similar to the butterfly stretch, you’ll start sitting in a chair with your feet up on a chair with your knees splayed outward. This time, though, your feet won’t be touching, and you’ll focus on leaning backward so that you can open your groins as much as possible.
5. Kneeling Lunge Stretch
 This exercise is somewhat deceptive in terms of how it can affect your hips.
You may need some trial and error to find the best front foot positioning, which happens when your shin is upright when you lean forward, rather than being angled down or back. Keep your hips square and your upper body tall, and you’ll be in the right position. Don’t be afraid to adjust the back leg positioning to get the most out of the stretch to release your hip flexors.
Key Points:
- Get into a lunge position, with knee and foot about hip width apart from the elevated leg.
- Keep the chest tall and the hips square.
- To make the stretch harder, you can pull the back knee up off the ground.
Beginner Version: Sit with just one leg supported by a chair, with your other leg bent behind you. Keep the knee lifted off the ground if you can, and try to square up your hips as much as you can. Emphasize opening your rear hip flexor by squeezing your rear glute.
6. Traveling Butterfly
 This movement goes from longsitting (on your butt with your legs straight out in front), to the butterfly stretch position.
It’s meant to be a dynamic motion, and you won’t hold any position here for more than a few seconds. This is a great way to improve circulation and get the hips moving after the stretching you did in the last 5 moves.
Key Points:
- Sit on your butt with feet straight in front of you (longsitting).
- Use your hands to push the hips forward toward your heels, so you wind up in the butterfly position.
- Move between the long sitting and butterfly positions.
Beginner Version: You’ll notice there is no modified version of this exercise included in the video above. That’s because it’s a little difficult to do this one on chairs or an elevated surface without making the exercise more difficult! This is a good example of when it’s okay to just skip an exercise if it’s too challenging for you.
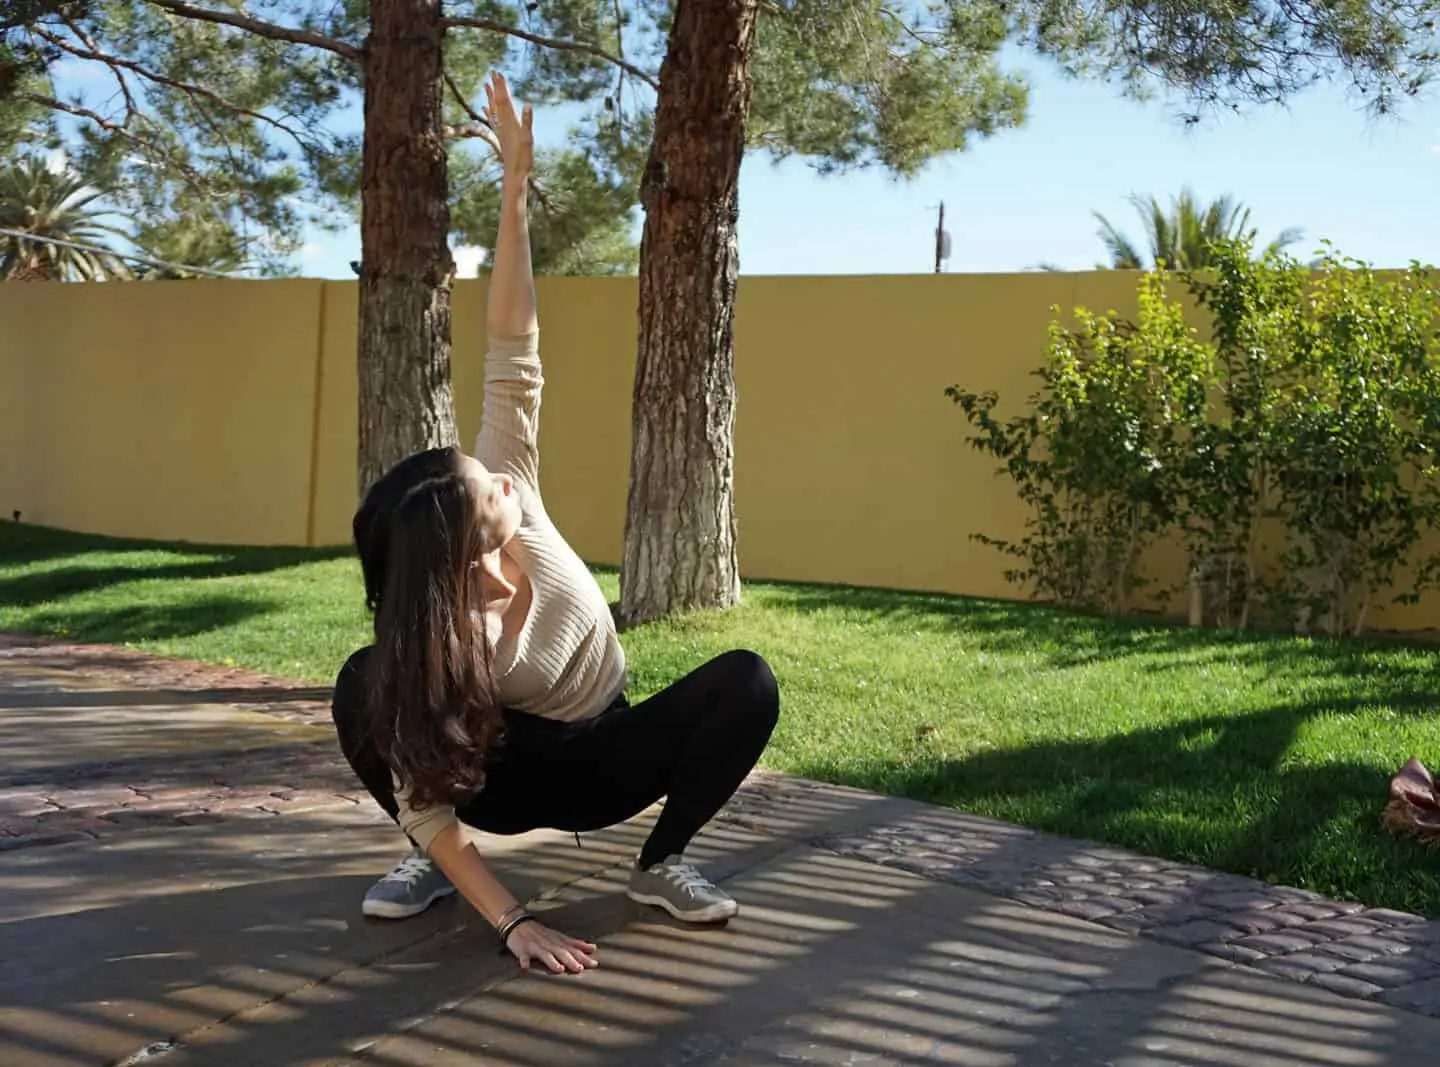
7. Squatting Internal Rotations
 This is another dynamic movement like the traveling butterfly, which I’ve put toward the end to encourage blood flow and circulation after all the previous stretches.
Don’t hold the end position very long at all. Just keep moving and give yourself some time to work through the movement.
Key Points:
- Start in a deep squat position (as deep as you can go).
- Rotate one knee inward, down toward the ground.
- This stretch can be done sitting on a small stool if you cannot get into a comfortable squat position.
Beginner Version: For this modified exercise, you’ll use a chair (or any sturdy object that’s the right height for you) to support you as you lower into a squat. Then go through the internal rotations while holding on for support. This way you can adjust your depth and range of motion as much as you need to.
8. Pigeon Stretch
 The pigeon stretch is another classic stretch that can help you work on, not just your hip mobility, but also your hamstring and spine flexibility.
Key Points:
- Start with your front knee bent to a 90-degree angle. The back knee can be as bent or extended as is comfortable for you.
- Rotate the back hip toward the front heel, and then toward the back foot.
- Keep the chest up tall, and only bear as much weight as you can comfortably.
- If you feel comfortable with the knee bent, you can work on straightening out the back leg into the full pigeon pose.
Beginner Version: Sitting on a chair, lift one leg up on to another chair with the knee bent in front of you, allowing your rear leg to fall comfortably to the side. Use as many supports as you need to to make the front leg as comfortable as possible. Lift your chest and hinge from the hips to lean forward toward your front leg.
🆓 Download the Detailed Exercise Cheatsheet
You’ll wanna use these routines often, so grab a copy to keep on your device and refer back to later.
How to Create Your Hip Mobility Training Plan
Nothing I’ve shown you here is going to make a difference if you don’t put it to use.
And the unfortunate truth is that you didn’t get stiff overnight, did you?
Nope.
It took years, and correcting it will also take a bit of time.
It doesn’t have to take years, but it does take consistent effort.
So let’s look at how to do that…
(Hint: download these resources to refer back to.)
Choosing Hip Mobility Exercises
As I’ve said a few times already, most people should simply follow the movement routine at the top of this article.
- 5-10 minutes
- 3-5 times each week
- Be gentle and exhale into tension
It doesn’t need to get any more complicated than that, and there’s no hard and fast “rules” for this kind of work.
When to Use Specific Stretches
Maybe you’ve got one or two spots that are just much stiffer than the rest of your body.
Or perhaps you’re trying to correct a movement restriction that’s causing pain or preventing you from moving the way you’d like.
Here’s what I’d recommend for that:
- Start with the movement routine for 5-10 minutes.
- Then do 2-3 specific stretches that address your concerns.
- 5-10 contractions per side
- a 10-30 second hold
- Repeat 3-5 times per week
Again, this may look “simplistic,” but we’re not trying to create the most complex program here… You want a reliable routine you can follow consistently, week after week, to ensure real progress.
Put Your Hip Mobility Practice on a Systematic Track
The routines on this page can take you a long way. To keep making progress beyond what they cover, you’ll want a system that progresses with you.
For most people: GMB Elements
Elements is our flagship total-body practice. You’ll work hip mobility alongside the strength, control, and movement skills you actually use in daily life. It includes the locomotor patterns that loosen your hips most effectively, plus everything else your body needs to move well at any age.
Hip mobility built into the bigger picture of how your body needs to move.
Already training? GMB Mobility is the focused option.
If you’re already lifting, running, climbing, doing martial arts, or otherwise training regularly, and you only need to add the mobility component, Mobility is purpose-built for that.
Adds onto your current routine.

Hip Mobility FAQ
Mobility is a vast and complex subject… if it were simple, nobody would be stiff!
If you’ve got specific questions about loosening up your hips, chances are, you can find an answer below.
And if not, feel free to shoot us an email. Our coaches are here to help, and we might update this article with you Qs later.
Top Questions and Answers
These are the ones we hear again and again…
How often should I practice?
This routine is gentle enough that you don’t have to worry about overdoing it (especially if you’re staying in a low rep range). And the modified version of the routine gives you good options for practicing in any chair, even if you’re at work or doing other things.
General principles for training frequency:
- short, frequent sessions are best
- make use of the chair variations at work
When in doubt, start simply: 3-5 times a week is enough for most people to begin feeling the benefits.
When should I practice?
Some people enjoy doing mobility work when they first wake up to shake off the cobwebs, or just before going to sleep to get a nice stretch in.
The best times to work on hip mobility:
- in the morning to get your day started
- as part of your regular training – doesn’t matter if it’s before or after, just fit it in wherever it feels best or you
What if I have FAI (Femoroacetabular Impingement) or another medical condition?
These hip mobility routines have helped a lot of people, including those with hip impingements. For more on what’s actually happening in the hip joint and how to think about conditions like FAI, see Understanding Your Hips. That said, there’s different degrees of any condition, and it’s best to ask a doctor or physical therapist if you’re unsure.
Generally, if you’re healthy enough to walk around without pain, these should be fine for you to gently explore. That means going slowly and not pushing into pain.
What if some of the stretches are difficult or hurt?
If one of the movements doesn’t feel good, you can skip it and focus on the others.
After a week or two of doing the ones that feel more comfortable, you can try again. Often, you’ll find that you’ll have loosened up a bit, and you’ll eventually be able to perform all the exercises.
How do I know if I have tight hips? What are the symptoms?
Here are the most common questions we’ve gotten about the symptoms of hip tightness, and what causes your hips to be tight.
How do you know if you have tight hips?

Put simply, you know if you have tight hips if you feel restricted in motions you want and need to do in your daily life. If you dread having to stoop down on the floor, or crawl under your desk to pick something up, then you probably have tight hips.
It would be easy to just give a set of “standards” to meet that tell you if you have tight hips, such as: Are you able to touch your toes with your knees straight? Can you step forward 3 feet into a lunge and keep your body upright? These can be good tests but they’re arbitrary.
A better, more individualized, answer to that question involves looking at how you feel and move during your day.
- How do your hips feel when you squat up and down, kneel, and twist when you do your chores around your house?
- Is there anything holding you back in your hobbies and physical activities you like to do?
Looking at it that way, you can find out if it is your hip mobility that is preventing you from enjoying how you use your body in your life. And with those specific activities in mind, it’s easier to know what exercises you may need to fix that.
What are the symptoms of tight hip flexors?
If you feel discomfort and tightness in movements where one leg is forward and the other back behind you, your hip flexor muscles are likely the culprits.
Our hip flexor muscles’ primary function is to lift our knees up in front of us, and one hip flexor also helps to straighten our knee. If those muscles are tighter and affecting how you move, you’ll likely feel tightness (and possibly soreness) right in front of your hip (below your hip bones), and also in your lower abdomen.
This would affect you most in activities such as stepping up onto a high platform or steps, especially when your upper body is upright and not bent forward.
What are the symptoms of a tight psoas muscle?

You may feel a sensation of tightness and ache in your lower abdomen and the top of the front of your hip. There can also be difficulty and pain in lunge positions (where one knee is far forward and the other leg is stretched back behind you).
The psoas muscles attach to your lower spine and go forward to the front of your upper thigh bone (femur) and help to lift your leg up in front of you. So you may also feel it in walking and running activities.
What are the first signs of hip problems?

We usually first feel these issues when we start to exercise or participate in sports where we have to lunge and twist and kneel in much larger ranges of motion than we do in our normal day. We then feel this afterwards in symptoms of muscle and/or joint soreness.
If we’re lucky, these are temporary and go away as we get used to these activities. It’s when they linger for more than a few days or steadily get worse that it becomes a problem.
In general, most people don’t take their hips through their full ranges of motion in their daily activities. We sit and walk and occasionally take the stairs and walk up and down inclines, but these are mostly “mid-range” activities. They don’t challenge our hip mobility or go to our “end ranges” of motion.
So we don’t usually realize when our hips begin to lose range of motion until we try to do things that go to these end points.
This can be prevented by working on hip exercises that take us through our full hip ranges of motion, gradually working on improving this at our own pace versus having to suddenly do this in sports and hiking and other physical activities.
Why are my hip flexors tight?

In general, most people don’t take their hips through their full ranges of motion in their daily activities.
We mostly sit at our desks or in the car throughout the day. We do walk and occasionally take the stairs and walk up and down inclines, but these are mostly “mid-range” activities. They don’t challenge our hip mobility or go to our “end ranges” of motion.
Because of this, our hip flexor muscles decrease their tolerance for stretch and we feel that as tightness. Also we can “forget” these end ranges of motions, so when we do go to these stretched positions they can be interpreted as dangerous by our muscles and nervous system, so they become restricted as a protective measure.
How do I know if my hip flexors are tight?

Put simply, you know you have tight hips if you feel restricted in motions you have and want to do in your daily life. If you dread having to stoop down on the floor, or crawl under your desk to pick something up, then you probably have tight hips.
It would be easy to just give a set of “standards” to meet that tells you if you have tight hips such as: Are you able to touch your toes with your knees straight? Can you step forward 3 feet into a lunge and keep your body upright?
These can be good tests but they are arbitrary.
A better, more individualized, answer to that question involves looking at how you feel and move during your day. How do your hips feel when you squat up and down, kneel, and twist when you do your chores around your house? Is there anything holding you back in your hobbies and physical activities you like to do?
Looking at it that way, you can find out if it is your hip mobility that is preventing you from enjoying how you use your body in your life. And with those specific activities in mind, it’s easier to know what exercises you may need to fix that.
What does hip mobility mean?
Hip mobility is physiologically defined as the hip joints’ ability to go through the various ranges of motion available at the joint (flexion, extension, abduction, adduction, external and internal rotation).
This can involve freedom and restriction of the joint itself, as well as the pliability of the muscles surrounding the hips.
How do I loosen my tight hips? What exercises fix hip tightness?
How do you loosen stiff hips?

There are a variety of good hip exercises to do, and the combination of static (holding a stretched position) and dynamic (active movements) is best. This style of exercise combines learning how to relax, in the stretched position, and controlling how to move into and out of these positions. Both are necessary to improve and retain your hip mobility.
What is best to do first though is figure out which particular hip movements feel stiff for you, this then lets you be efficient in choosing hip exercises to help. Do you have trouble rotating your hips in and out? Bringing them in front of you or back behind you?
Pick a couple of exercises that match those more difficult motions and work on those every day. Our hip mobility routine is a good place to look for exercises to work on.
How can I realign my hips?
First, let’s talk about what “realignment” means. There really isn’t a perfectly symmetrical positioning of our hips. Our bodies are more complex and resilient than that. So if someone does some tests on you and says your hips aren’t aligned, you should take that with a very big grain of salt.
This doesn’t mean that you can’t feel sensations of stiffness or simply “being off” in your hips, especially if one hip feels much different than the other in some motions or in strength.
If this is the case then there are a variety of hip exercises that will help improve your range of motion and strength in flexion, extension, and rotations. This would be a very good start in getting your hips to feel the way you want.
How do you loosen tight hips and lower back?

First is identifying which particular movements feel stiff for you, which then lets you be efficient in choosing hip exercises to help.
A combination of static (holding a stretched position) and dynamic (active movements) is best. This style of exercise combines learning how to relax in the stretched position, with controlling how to move into and out of these positions. Both are necessary to improve and retain your hip and lower back mobility. (Click here to learn more about different styles of stretching and why we recommend a combination of static and dynamic).
It’s also very important to include strengthening work to complement these improved ranges of motion.
How do you stretch your hip flexor?

There are several hip flexor muscles, and one that both moves the hip and the knee. To stretch the ones that only move the hip, bring one leg forward and the other is placed back behind you. The stretched hip flexors will be of the leg stretched back behind you.
To stretch the hip flexor (rectus femoris) that also crosses the knee, you’ll have to be in this lunge position while also bending the knee with your foot moving toward your butt.
How do you work on your hip mobility?
First is identifying which particular hip movements need more work to reach your hip mobility goals. For example, squatting all the way to your heels, lunging forward, sitting with your knees apart; this then lets you be efficient in choosing hip exercises to help.
A combination of static (holding a stretched position) and dynamic (active movements) is best. This style of exercise combines learning how to relax in the stretched position, with controlling how to move into and out of these positions. Both are necessary to improve and retain your hip mobility.
How do you get a full range of motion in your hips?
A combination of static (holding a stretched position) and dynamic (active movements) is best. This style of exercise combines learning how to relax in the stretched position, with controlling how to move into and out of these positions.
For instance, one of our favorite hip stretches is the kneeling lunge stretch. Rather than just getting into the stretch and holding it for an extended period, you’ll work on contracting the muscles, moving in and out of the stretched position with control. Then, you’ll hold the stretched position for a short period (15-30 seconds). Repeat 2-3 times.
How do you increase hip flexor mobility?

There are several hip flexor muscles, and one that both moves the hip and the knee. To stretch the ones that only move the hip, you have to bring one leg forward with the other placed back behind you. The stretched hip flexors will be of the leg stretched back behind you.
To stretch the hip flexor (rectus femoris) that also crosses the knee, you’ll have to be in this lunge position while also bending the knee with your foot moving towards your butt.
How do tight hips affect the body? Do tight hips cause knee or back pain?
Can tight hips cause knee pain?

The causes of pain are difficult to pin down, and it’s usually more than one factor. But tight hips can contribute to knee pain especially if the tightness at the hips causes the knee to move more and in directions that can be irritating.
Our hips are much stronger structurally and have more muscle than our knees. They are meant to provide most of the force for lifting, jumping, running, and even simpler activities like kneeling and squatting. If these forces are transferred to our knees then they can cause overuse and repetitive strain problems.
Can tight hips cause lower back pain?
Lower back pain is very complex, and chronic pain (lasting longer than 12 weeks), can involve many contributing components. Tight hips may be a part of this if the tightness causes you to move your lower back in ways it’s not prepared for.
For example, when you lift something up from the ground and your tight hips make it more difficult to get into the best positioning, then your back muscles and joints have to take more of the strain to complete the lift. If this is more than those muscles and joints can handle, either with small loads repeatedly, or a heavy object once, then this can cause pain. This is especially true if your low back is more sensitive because of prior injuries.
It can be very helpful to improve your hip mobility and strength to lessen the strain to your lower back.
Can weak glutes cause tight hip flexors?
There is a supposition wherein the body responds to a lack of strength/stability in one muscle with increased tone and tightness of another muscle. There really doesn’t seem to be any direct evidence for this. There are instances of people being tighter or more loose in general throughout their entire body. But as for weaker glutes making your hip flexors tighter, I would disagree with that assertion.
Can the lower back cause hip pain?
Yes, due to the phenomena of “referred pain,” wherein the cause of pain is not necessarily at the site of the pain. The lower spine and nerve roots and peripheral nerves can be irritated and cause pain to the front, side, and back of the hips.
How do you stretch tight hips? Can stretching improve hip mobility?
How do you stretch the side of your hip?

Unfortunately this isn’t as simple as showing one stretch, as the “side” of your hip is comprised with several muscles and structures. You might need to stretch in different positions to access the muscles around the areas that feel tight.
On the side of your hip from around the joint level and up can include several glute muscles and other hip rotators. Directly to the side and lower towards your thigh could be the Tensor Fascia Latae muscle and the Iliotibial band (ITB) and even your lateral quadriceps and hamstrings.
How can I improve my mobility?
A combination of static (holding a stretched position) and dynamic (active movements) is best. This style of exercise combines learning how to relax in the stretched position, with controlling how to move into and out of these positions.
(Click here to learn more about different styles of stretching and why we recommend a combination of static and dynamic).
Does stretching increase mobility?

It certainly can, when you stretch consistently and follow it up with more active exercise.
Short term stretching, defined as seconds to a few minutes in one session, tends to immediately improve how far you can move the body area. This is due to an increase in your “stretch tolerance.” Basically how much your body can tolerate a stretched position.
This isn’t necessarily an increase in your mobility, however, mostly because it is temporary, lasting only a few minutes or so. But if you take advantage of this time where you can move the stretched area more, do repeated movement in this period, and do this consistently over weeks/months, you should see improvements in your mobility.
Does stretching help blood flow?
Stretching can help improve blood flow to the stretched area if it causes a sensation of decreased tension. This then allows you to move the area more. This increased movement and muscle contraction does facilitate increased blood flow, though stretching by itself likely does not significantly improve blood circulation.
What happens if you don't stretch?

In general, our bodies tend to hew to the saying of “use it or lose it,” primarily because of the principle of conserving resources. It takes energy to maintain muscle and bone structure and one reason why bone and muscle growth happens is the body’s perceived need to adapt to the loads being placed upon it.
Range of motion in increased joint mobility and flexibility is much the same—there is energy required to maintain them. And if there is no challenge to these range of motions then there is no perceived need to maintain them.
These generally would happen over the course of a couple of weeks.
If you aren’t necessarily doing dedicated stretching but you do exercise and other activities that go through a decent range of motion a couple time of week, you probably wouldn’t notice anything, until you try to go into significantly challenging ranges.
How do squats increase hip mobility?

The bottom of a squat exercise (also called the squat position) has the knees brought up towards the chest and your knees bent fully. This position of full hip flexion generally stretches the glutes, hip rotators, and also the hip adductors if your knees are pushed out to the side.
Doing this repetitively up and down as far as is comfortable takes your hip joints through a challenging range of motion for most people, both for their joints and the surrounding muscles. Doing this repetitively trains your joints and muscles to adapt to the motions and make changes. Just as in strength training, flexibility training requires repeated challenges for you to improve.
Is yoga good for mobility?
Yoga can be good for a lot of people that want to improve their mobility. If you like doing yoga, then that’s great, but it’s not necessary to improve mobility. A lot depends upon the style/class/teacher. Some may be able to adjust to your individual needs and others will have you follow the class no matter what. There are also other things that accompany yoga (chanting, meditation, etc) that you may not necessarily want.
Hip Pain and Injuries
Where is hip flexor pain felt?
You’ll likely feel tightness (and possibly soreness) right in front of your hip (below your hip bones), and also in your lower abdomen.
Our hip flexor muscles’ primary function is to lift our knees up in front of us, and one hip flexor also helps to straighten our knee. If those muscles are tighter and affecting how you move then you might have symptoms in lifting your leg forward and in activities like walking and running.
What are the signs and symptoms of a hip flexor strain?

You’ll likely feel tightness (and possibly soreness) right in front of your hip (below your hip bones), and also in your lower abdomen.
In terms of movement symptoms, you may feel pain/ache:
- when raising your knee up in front of you
- when you are striding forward or stepping up and your leg is stretched behind you
- when you walk and stand for a prolonged period of time. You may not feel it right away but only after 5 to 10 minutes or more.
How long does it take for a strained hip flexor to heal?
It depends on the severity of the muscle strain. There are different classifications of muscle strain, graded by how much of the muscle fiber is affected.
- Grade 1 strains are when only a small percentage of fibers are torn. There is pain and tenderness, but your range of motion and strength isn’t greatly affected. These usually heal within a few days to less than two weeks.
- Grade 2 strains have many more fibers torn, up to half of the muscle. There is significant pain immediately at the time of injury and it’s painful to move your hip. You may also feel swelling at the front of the hip. This injury can take several weeks or more to heal fully.
- Grade 3 strains are a full tear of the entire muscle and, as you can imagine, is very painful. This often requires surgical intervention to heal, and rehab will take several months.
Should you stretch a strained hip flexor?

This depends upon the level of injury (see above for Grades of strain). For Grades 1 and 2, it can be helpful to stretch but with careful considerations.
In the initial hours and day or so after the injury, it’s best to rest and gently move your hip in as much pain free motion as possible. If it is painful even at rest, you can still move but only to the point where it doesn’t increase your pain above a 4/10. If that isn’t possible, then you’ll likely need to rest more and seek medical attention.
After a couple of days or so you can lightly stretch the muscle by going into the stretch and holding just a few seconds and repeating that several times. Again with the rules of as much pain free as possible and/or not increasing your pain past 4/10.
Why does the outside of my hip hurt?

Unfortunately, there is not a simple answer to this question, as the “outside” of your hip is comprised of several muscles and structures.
If you experience pain on the side of your hip from around the joint level and up, there could be tightness or other issues with several glute muscles and other hip rotators. If your pain is directly to the side and lower towards your thigh, your issues could be with the Tensor Fascia Latae (TFL) muscle and the Iliotibial band (ITB) and even your lateral quadriceps and hamstrings.
Any of these structures could be strained from movement or trauma and could be the source of your pain.
There could also be what is called “referred pain”, which is when the source of the pain at the outside of your hip is not those structures. It could be the lower back, where there is nerve irritation or similar.
A way to analyze this (aside from seeing a health care professional, which is recommended), is to think about what changes in your activities happened in the past few weeks. Did you fall? Did you get hit? Did you start a new exercise routine? Did you do more in your exercise routine? Etc.
Why does the front of my hip hurt?
The front of your hip includes the hip joint, hip flexors, hip adductors, quadriceps, femoral (and other nerves). Any of these structures could be strained from movement or trauma and could be the source of your pain. There could also be what is called “referred pain”, which is when the source of the pain at the front of your hip is not those structures. It could be the lower back, where there is nerve irritation or similar.
A way to analyze this (aside from seeing a health care professional, which is recommended), is to think about what changes in your activities happened in the past few weeks. Did you fall? Did you get hit? Did you start a new exercise routine? Did you do more in your exercise routine? Etc.
Even More Resources for Better Mobility
If you’ve got tight hips, it’s your lucky day.
Since so many people come to us with hip mobility restrictions, we’ve put together quite a few helpful resources over the years, to address different aspects of this complex and disruptive problem:
- Understanding Your Hips — Jarlo’s deeper look at what’s going on in the hip joint, common complaints, and how to think about conditions like FAI without panicking. Useful background for anyone who wants the “why” behind the routine.
- Routine for Hip Pain — If you’re in active pain, this routine is designed to help you address and overcome that.
- Fix Your Tight Hip Flexors — A focused look at the front-of-hip tightness most desk workers carry. Stretches, strengthening, and how the two work together.
- Hip Opener Exercises — Functional hip-opening movements that go beyond static stretches, with strength built in.
- Hamstring Flexibility Guide — It’s quite common for people with tight hips to also have tight hamstrings. If that sounds familiar, this guide will help.
- How to Adjust Stretches — You may feel like you’re “too tight to even stretch” (that’s a common one we hear!). I promise you’re not too tight, you just may need to make some adjustments. This article will give you some good tips for adjusting any stretch.
🆓 Download this Tutorial Video & Cheatsheet
You’ll wanna use these routines often, so grab a copy to keep on your device and refer back to later.
Active Adults Need Flexible, Mobile Hip Joints
When I began my career as a physical therapist over 20 plus years ago, I treated a steady stream of patients suffering from a wide range of issues from low back aches to knee pain, to being unable to sit down and tie their shoes.
Quite a lot of them had one thing in common—they weren’t able to move their hips well.
Improving their hip mobility led to decreasing the strain on their low backs and knees, making their walking, stair climbing, and running gait more efficient, and creating more ease in their daily activities such as getting in/out of car, on/off the floor, and even being able to tolerate long drives in their cars.
Tight hips have probably gotten in the way of your daily activities or exercise goals countless times. And that’s really why hip mobility is so important—because when it’s missing, your options become a lot more limited.
 The hips are connected to every part of the body, and when they’re not moving well, there’s a chain reaction of restriction. You can’t squat easily, your hamstrings start to feel tight, maybe you compensate with certain movements when you walk which causes your back to start tightening up—and so on and so forth.
Our goal at GMB is to help you feel free in your body—free to do the things that are important to you, and free from pain and restrictions.
And that’s just not possible (at least not fully) if tight hips are getting in your way.
Hip Mobility Is a Practice, Not a One-Time Fix
Tight hips don’t get fixed in a six-week sprint. They get better when you keep showing up, a few minutes a day, most days, for as long as you’ve got hips.
The clients who keep their hips healthy treat the work as ongoing practice, the same way they brush their teeth. The ones who stay frustrated treat it as a project to finish, hit the goal, and stop. Hips don’t work that way.
So pick a starting point. Practice consistently. The work compounds.
Hip mobility built into a system you can return to for years, with the strength and control to back it up.
Already training and just need the focused mobility component? GMB Mobility is purpose-built for that.

I came to you 7 weeks ago and enrolled in the Mobility program as a 59-year-old with a hip problem. I'm now moving around like a 20-year-old! I've just enrolled for the Elements and Integral Strength programmes. Thank you GMB, for the wealth of knowledge and the work you all put in.

Hi, I'm Jarlo Ilano PT, DPT 👋
Jarlo Ilano, PT, DPT, OCS has been a Physical Therapist since 1998. He earned his Doctorate of Physical Therapy in Musculoskeletal Management from Evidence In Motion, was board certified as an Orthopedic Clinical Specialist with the American Board of Physical Therapy Specialties, and is a certified Therapeutic Pain Specialist through EIM/Purdue University.
In addition to cofounding GMB, Jarlo has been teaching martial arts for over 30 years, with a primary focus on Filipino Martial Arts. He designed our Train Without Pain guide and our knee and shoulder restoration programs.