Real core strength isn’t a six-pack. It’s the ability to brace your whole midsection and turn yourself into something solid when you need to be.
Crunches and sit-ups train one area at a time, and they’ll do something for the look if that’s what you’re after (fix your diet too). But if you want strength that shows up when you’re carrying a week of groceries up the stairs, balancing, or lifting something awkward, you need to train the whole container of your torso to lock down together.
That’s what the Hollow Body Hold does. It’s a staple in gymnastics and calisthenics for a reason. Back in my gymnastics days we did hollow body work constantly for conditioning, and it’s still one of the most honest tests of core strength I know. You either create the tension correctly or you fall apart in a few seconds. There’s no faking it.
In this article I’ll show you how to do it right and how to build it into something you actually use.
Hollow Body Hold Tutorial
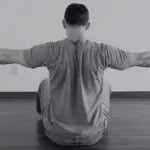
Here’s the full breakdown. The reason I’ve got my shirt off in this one is so you can see exactly what my lower back is doing in relation to the floor, because that’s the whole game.
The key point, the one thing that matters more than anything else: keep your lower back pressed into the floor. If there’s an arch under your back, you’re not in a hollow body, you’re just lying down with your legs up.
Why You Need More Than “Strong Abs”
Most core exercises hit one piece at a time. The Hollow Body Hold makes everything fire at once.
- Abs brace to keep your spine flat against the floor.
- Hip flexors and quads lock your legs in place.
- Obliques pull your ribs down and in.
- Low back muscles stabilize from behind.
That’s a lot of effort happening together, and learning to coordinate it is the part crunches and leg raises skip. Stay tight and connected while you manage leverage and strain, and that carries straight over into push-ups, pull-ups, and anything where you’re moving your limbs while keeping the rest of you under control.
And because it’s an isometric hold, there’s no bouncing through it. You build the tension or you don’t last.
How To Do The Hollow Body Hold Correctly
This move looks easy and it isn’t. If you’ve got a history of sitting a lot, it’ll find your weak spots fast.
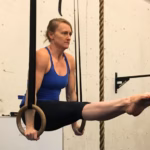
Here’s a good hold next to one that needs work:

On the left, Eduardo has his shoulders pulled back and needs to bring his knees up higher to keep his back flat. That usually means you don’t have the core strength yet to hold the position, and your hip flexors might be tight from too much sitting. On the right, he’s got it: back flat on the floor.
Here’s How To Do It:
- Lie down with your back flat on the floor.
- Bend your knees up toward your chest.
- Tuck your chin and bring your shoulders slightly off the ground. This isn’t a crunch, so keep your shoulders low.
- Extend your arms down along your sides, in line with the floor and reaching toward your heels, not up in the air.
Once you’re comfortable there, start pushing your feet away from your body, and eventually extend your arms back over your head. Only go as far as you can keep your lower back married to the floor. The second it lifts, you’ve gone too far. Pull it back in.
A good way to check yourself is the band test. Put a band or a towel under your lower back and give it a pull. If it slides out, your back isn’t flat.

Build this and you strengthen the whole midsection: the abdominal wall, the obliques, and the low back. That’s the core strength that helps your handstands, L-sits, squats, and pretty much everything else.
Next Step: Hollow Body Rocks
Once you can hold the position, put it in motion.
Don’t just throw yourself into the rock. Get good at rolling back and forth first while keeping that rounded back, so you’re not slamming your spine into the floor. If you get stuck on the way back up, it’s almost always because you opened your chest and flattened out. Keep the back rounded, and you can push with your feet to help you back up until you don’t need them anymore.
From there it’s a matter of extending the legs, then the arms, while holding the dish position. It should feel smooth. If it hurts, you’re not staying rounded.
When that gets comfortable, try candlesticks. We did a ton of these for conditioning back in gymnastics. Same rock, but you carry it further back and shoot your feet toward the ceiling while your arms reach back. Start with 30 seconds, work up to a minute, and you’ll hate me. That’s how you know it’s working.
Hollow Body Variations
Once you’ve got solid hollow body strength, you can branch into more varied patterns built off the same position.
Go slow and you build strength, flexibility, and the control to move confidently from one position into the next.
That control is the whole point. This was never about a six-pack. It’s about moving better, feeling better, and being able to do the things you want to do without your body getting in the way.
Stillness Isn’t Easy, But It Works
You’ll train foundational holds like the Hollow Body, Horse Stance, and L-Sit. No gear, no gimmicks. Just focused work that builds strength and control that shows up everywhere else.


Hi, I'm Ryan Hurst 👋
After a training accident ended his competitive gymnastics career, Ryan moved to Japan, where he spent close to 30 years training and competing in judo, kendo, and other martial arts until another injury made him rethink what training is for.
As Head Coach, he leads program design and teaches every week on our YouTube channel. His book, Stay On The Mat Forever, is aimed at helping you keep training for decades. He loves handstands, dogs, and hiking.