Everyone knows how to do push-ups, right?
Well… not necessarily. If you’re still doing push-ups the way you learned them in gym class, you’re probably not getting as strong as you could be from this fundamental exercise.
Plus, you could be setting your joints up for trouble.
With the technique and progressions below, you’ll build strength throughout your body while keeping your joints strong and stable.
Push-Ups are Boring, so Why Bother?

The most obvious benefit of push-ups is pressing strength.
Good pressing strength will help you do everything from push yourself off the ground, to pushing your car out of traffic if it breaks down, to learning more advanced bodyweight exercises down the line.
But, if you’re doing them right, push-ups help you build a whole lot more than just pressing strength. With the way we teach push-ups, as you’ll see in the next section, your entire body is involved, head to toe.
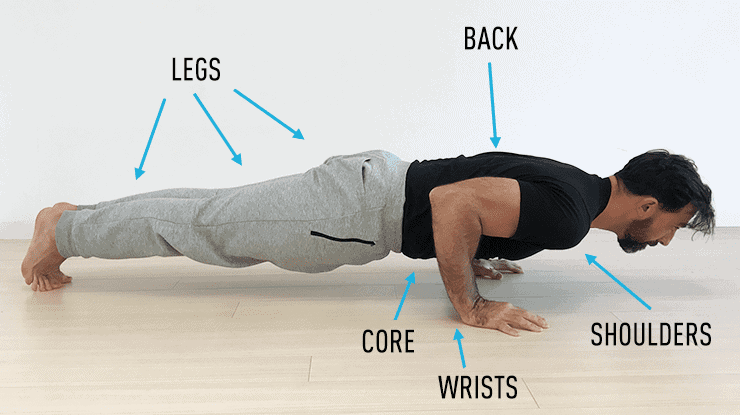
You use your entire body when you do push-ups the way we teach them here at GMB.
When you engage your entire body in this way, you’re learning something essential that will absolutely carry over into every aspect of your life: You’re learning to move your body as a unit, rather than as a collection of parts.
If you’re moving as a collection of parts, all of those parts are weaker and more prone to injury than if they’re moving together.
So, don’t dismiss push-up training or brush off the technique details I’ll show you momentarily. They’ll keep you safe from injury and make your movements more efficient for whatever you love doing.
How to Do a Proper Push-Up
You’ve probably done push-ups before and watched other tutorials, but I’m going to show you some techniques and progressions you may not have seen until now. They work wonders for building excellent pressing strength and improving your push-ups.
Proper Push-Up Progressions
If you watched the video above, you’ll notice that I started with the easiest version of the push-up first, and worked my way onto harder progressions.
To reap all the push-up benefits possible, you’ll want to make sure you’re working at a pace that makes sense for your current strength levels.
The goal here is to start where you’re comfortable and really nail the form before moving onto something harder. And it’s totally okay if you have to start with kneeling push-ups. We all have to start somewhere.
Let’s look at each of these progressions in detail:
1. Kneeling Push-Ups
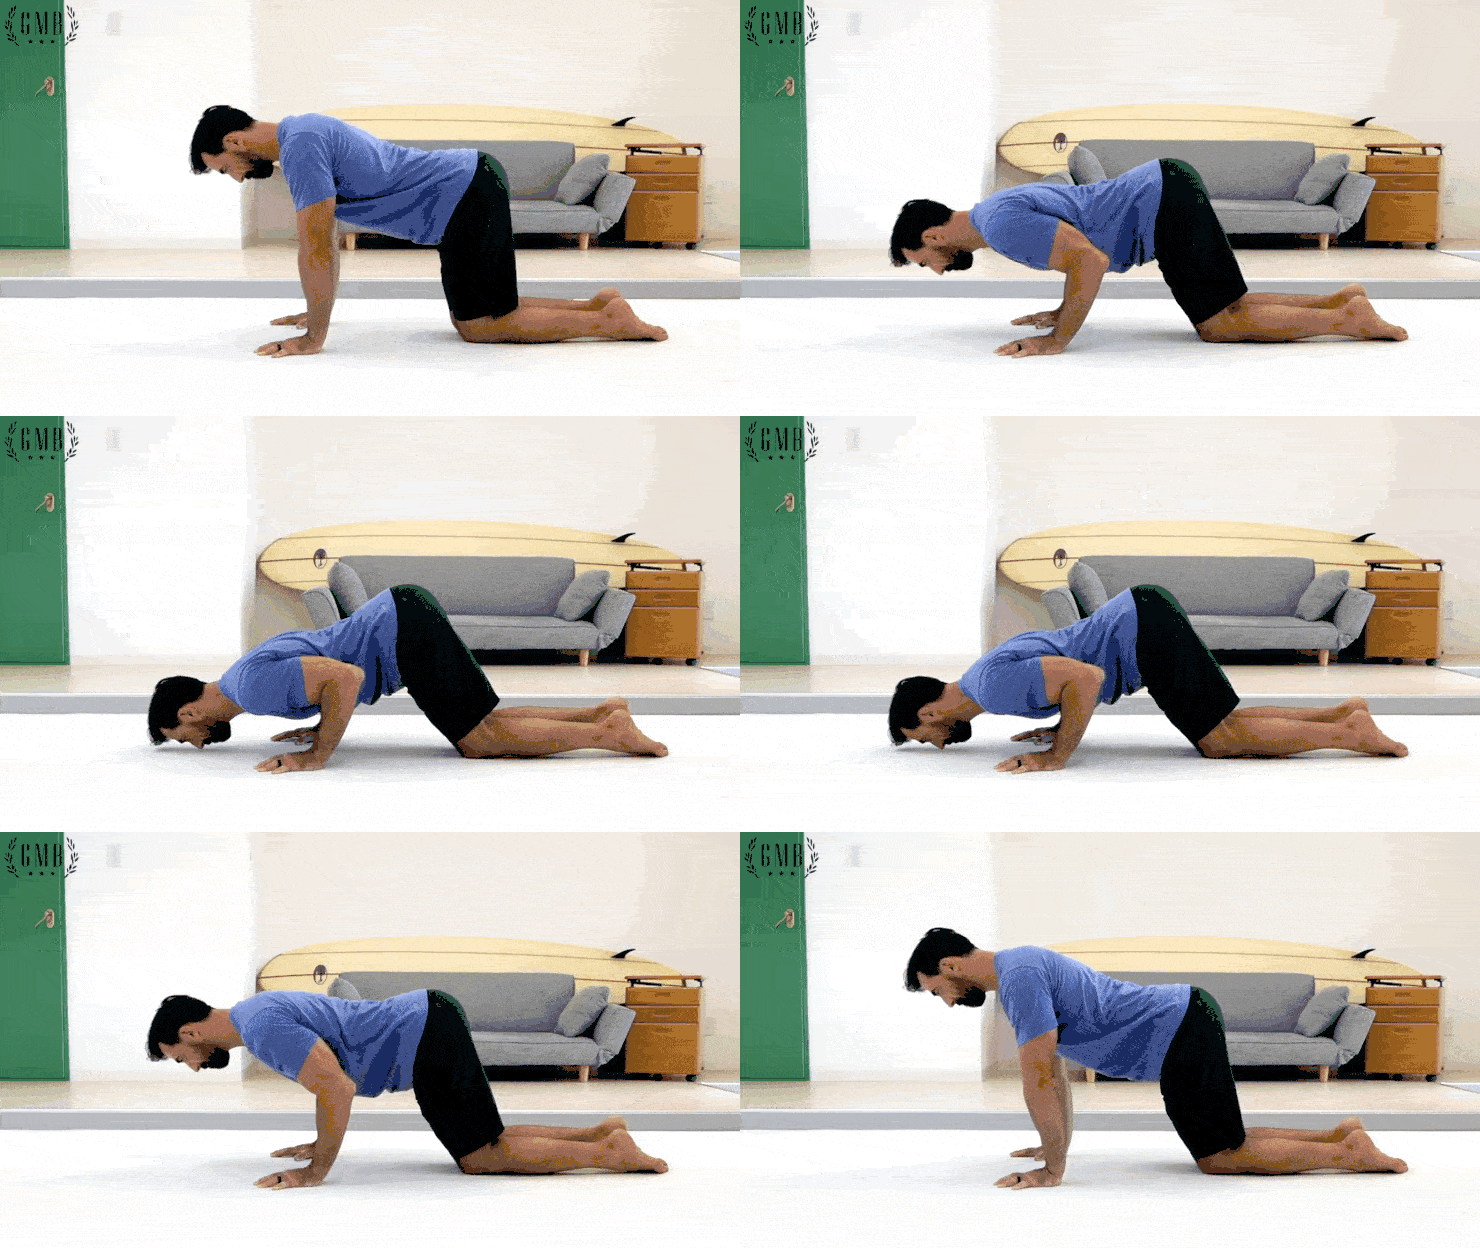
- Start on your hands and knees (tabletop position).
- Rotate your elbow pits forward and lower your torso, keeping your forearms perpendicular to the ground.
🚨 Note: These get a lot of hate because they “don’t engage the core,” and many coaches will throw a tizzy when you mention them…
In my experience with many thousands of beginners, the easiest path to frustration is to try and do too many things at once. So if you can’y do a single push-up yet, rest assured that we will adequately address your core strength later. Let’s start by getting you comfortable with pressing off the floor.
2. Full Negative

- Start in a full plank position, with your body in a straight line and everything engaged.
- Lower yourself all the way to the ground, keeping your elbows rotated forward and your entire body in one straight line.
- Go back to starting position however you feel comfortable.
3. Full Negative to Kneeling Push-Up

- Start in a full plank position.
- Lower yourself slowly and with control.
- When you reach the bottom, drop your knees down, and press your body up to the top of the kneeling push-up.
4. Full Negative with Quarter Push-Up
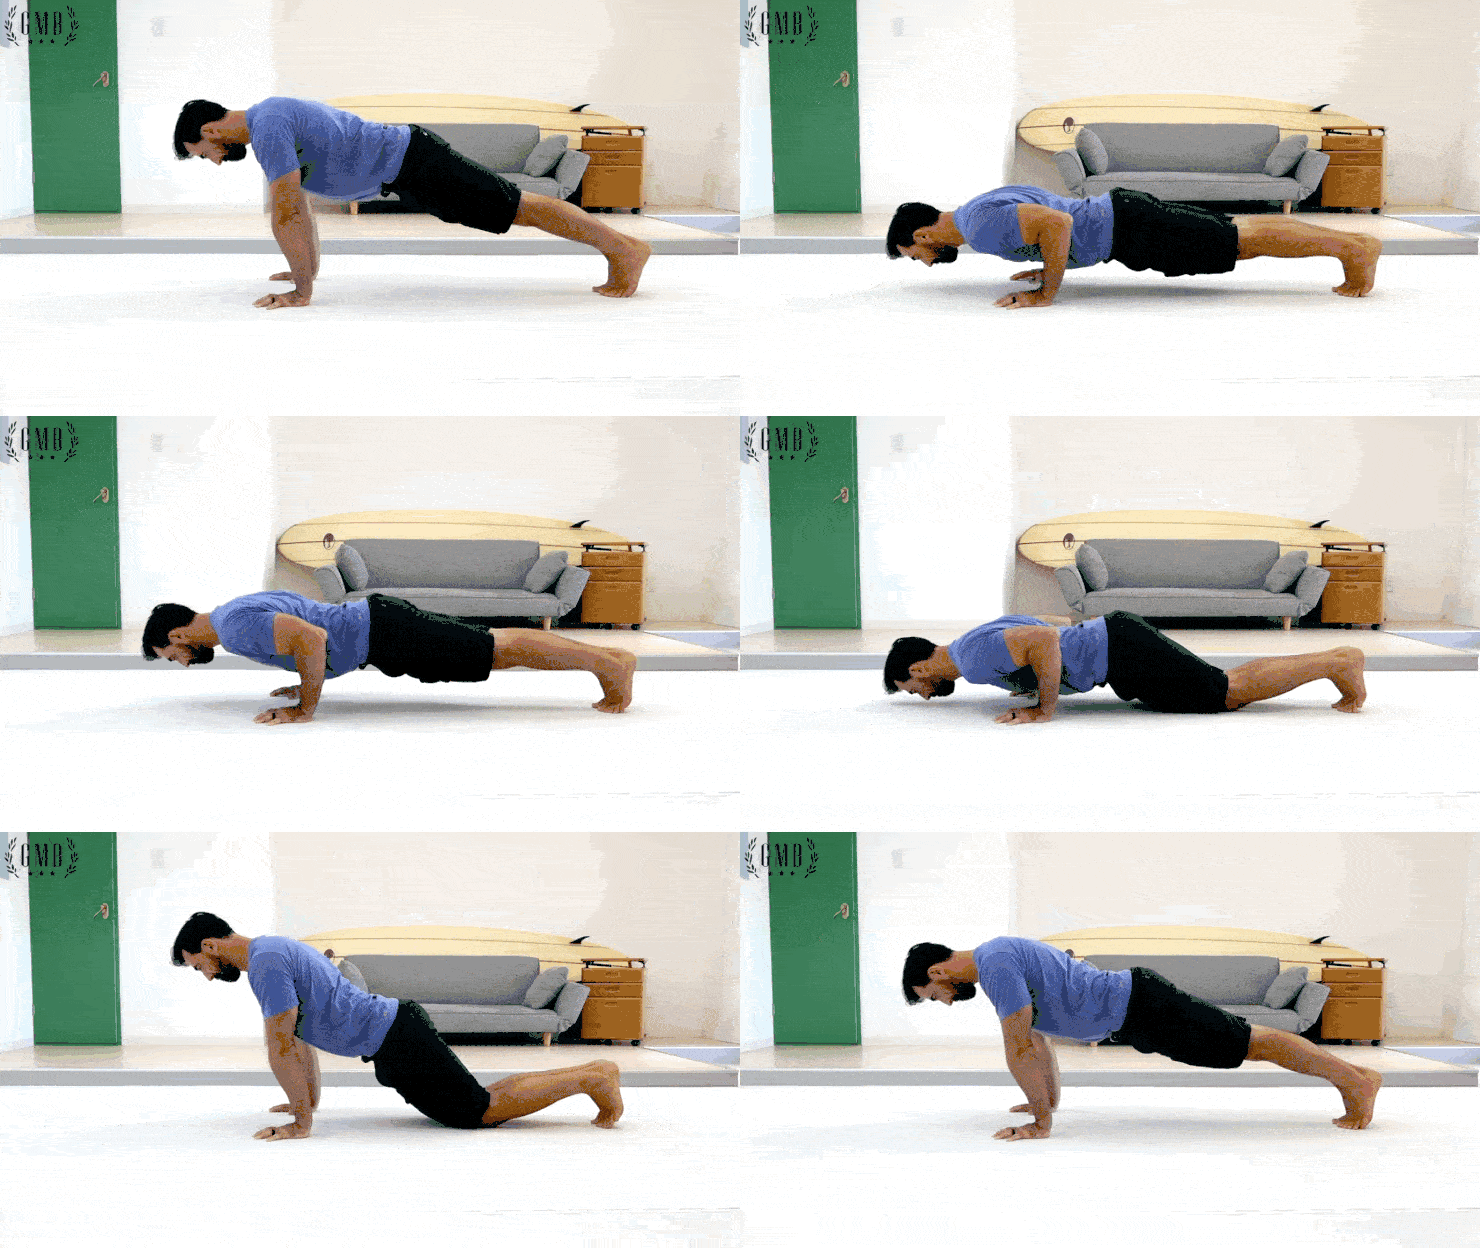
- Start in a plank position.
- Lower yourself slowly and with control, but before letting your chest touch the ground, press your body up just a few inches.
- Drop the knees and push yourself back up to the top of the kneeling push-up.
5. Half Push-Up

- Start in a plank position.
- Lower your body halfway, then push yourself back up to the top of the plank.
- Lower all the way down, then drop your knees and push yourself up to the top of the kneeling push-up.
6. Full Push-Up

- Start in a plank position.
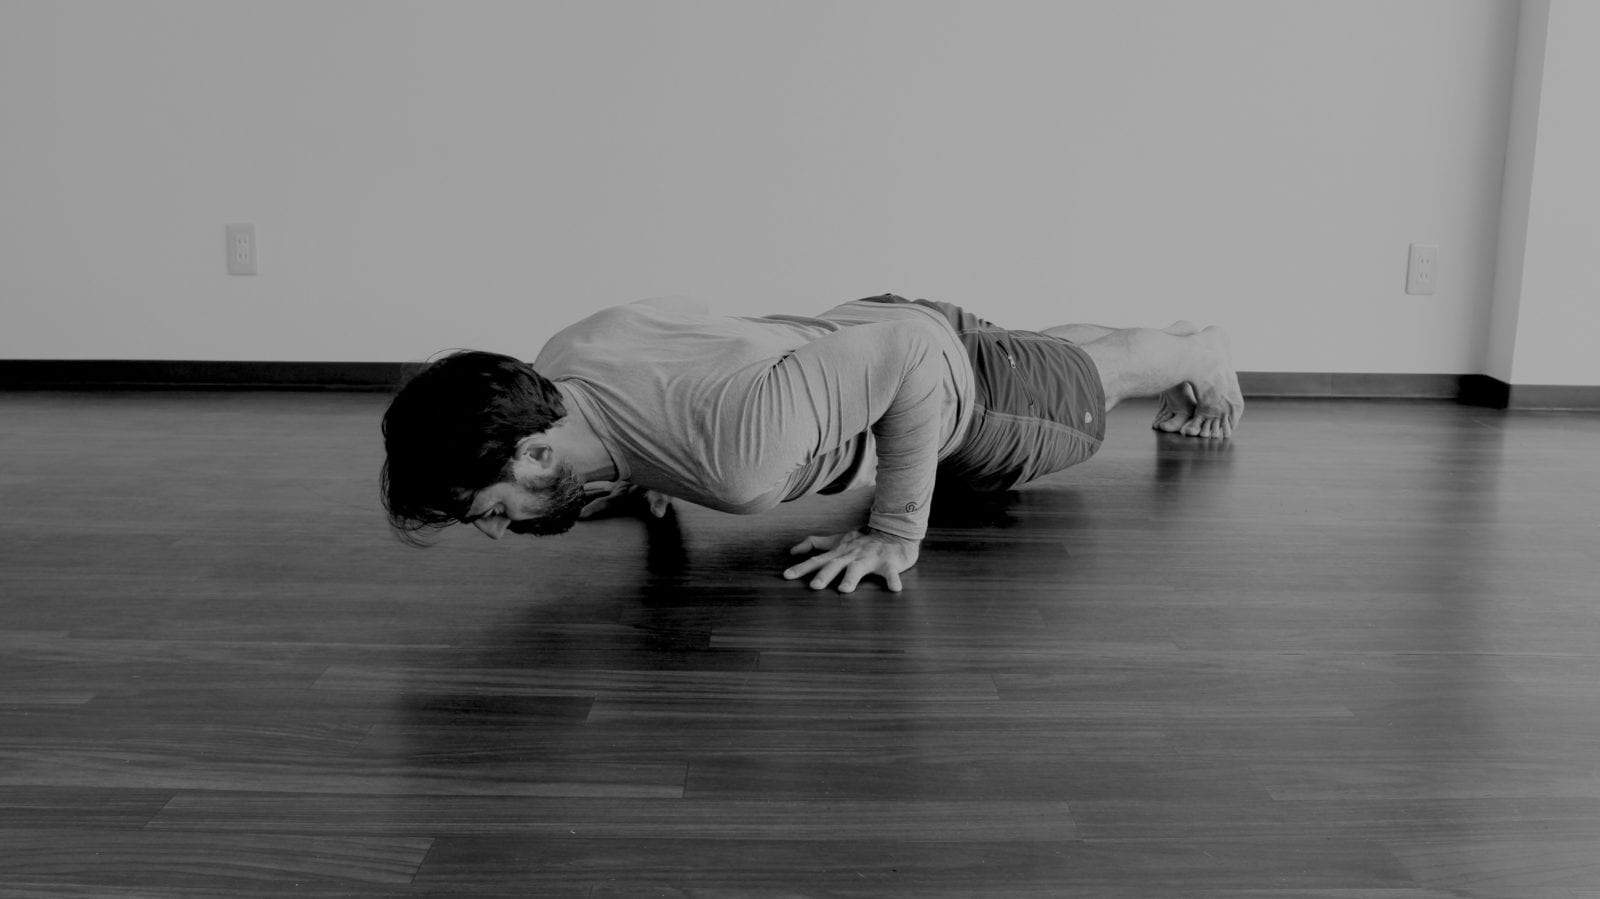
- Lower your body all the way down, keeping your elbow pits pointed forward and tucked in to your sides.
- Push yourself back up to the top of the plank.
Even if you’ve got a fair amount of experience with push-ups, I recommend starting from the first progression. You may be surprised that it’s a lot harder than it looks, and will help you strengthen areas you may have neglected in the past.
100 Push-Ups? Here’s something better…
One of the misguided approaches to getting in shape that I often hear about is doing a 100 push-up challenge.
Doing higher and higher reps do an exercise is a great way to put undue stress on your joints – especially if your form isn’t spot-on. It’s far better to gradually increase the difficulty:
👉 20 Advanced Push-Up Variations for Continued Strength Development
Key Points to Avoid Shoulder and Elbow Pain with Push-Ups
Even as you work towards more advanced push-up variations with good form, you may find that your shoulders and elbows start to feel sore.
Here’s a few tweaks you can make to your technique to protect your joints:
Remember that pain is a signal. Don’t ignore it.
Pushing through pain is usually a path to greater pain and possible injury. Be mindful as your strength increases that you don’t sacrifice long-term health for short-term gains.
More Technique Tips for Perfect Push-Ups
No matter what progression you’re working on, there are certain technique details that are essential to getting a perfect push-up every time.
I went over all of these details in first video above, but to recap:
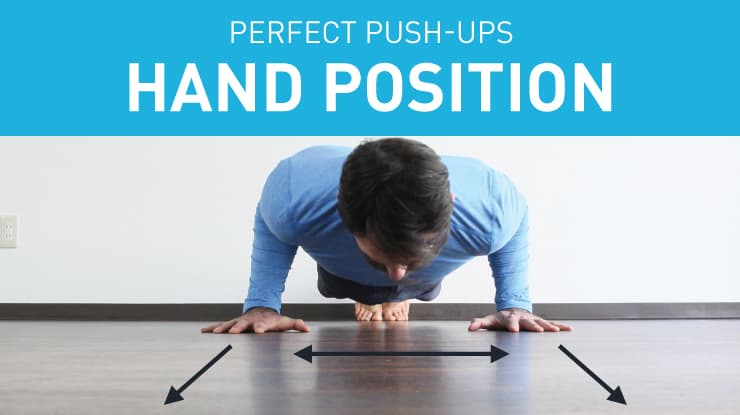
- Ideally, the fingers should face forward, but if you have wrist issues, you may want to angle them out a bit.
- The hands should be shoulder width apart, with the tips of the thumbs touching the shoulders in the bottom position.
Be sure to work on our wrist routine, especially in the beginning, as push-ups can place quite a bit of pressure on the hands if you’re not used to them.

- No matter which variation you’re working on, keep your elbow pits rotated forward so that your elbow is in alignment with your middle finger.
- Keep the elbows tucked in close to your sides as you lower your body.
- This position of the elbows is more stable for the shoulder joint than the more standard flared-out position you may have seen in other tutorials.
If you have any discomfort in your elbows, see our accompanying article on how to keep your elbows healthy.
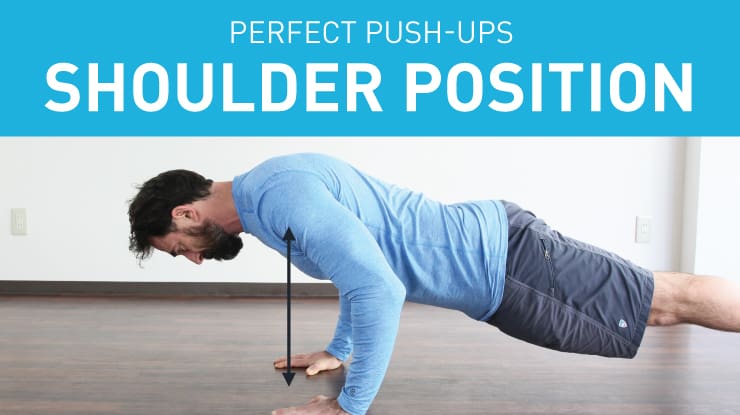
- The shoulder should be right above the wrists, with the forearms and upper arms in a nice, vertical line. When you do the actual push-up movement, you want to move straight up and down, without pushing your body backward toward your heels.
- When your strength improves, you can play with shifting your shoulders forward a bit, so they are in front of your hands. This forward lean is a great way to work on the positioning needed to progress toward skills such as the planche and press handstand.
For help with your shoulder mobility, you can work on our daily shoulder mobility routine.

- What we’re aiming for is a neutral head position, with the chin tucked in–not down–slightly. This position will create a nice, straight line from the crown of your head, all the way down to your heels.
- You’ll need to concentrate on keeping your head in this neutral position, as the tendency is to let the chin jut forward as you lower yourself. We don’t want this to happen.
If you have any trouble keeping your head in this alignment due to tightness or pain in your neck, see our article on the neck.

- The following applies primarily to the full push-up.
- Keep your butt squeezed tight, lock your knees out firmly, and pull your legs together as tightly as you can. It should feel as if your body is a solid piece from head to toe.
For more leg strengthening exercises, click here to see our bodyweight leg routine.
Build a Strong Foundation for Whatever You Enjoy
 Push-ups are a prime example of “back to the basics” training.
If you are just starting out with (or returning to) exercise, these basic and fundamental movements should provide the bulk of your training. They provide benefits beyond the obvious muscle work, laying a foundation for more advanced skills down the line.
Keep practicing the push-up with an emphasis on form and technique, and you’ll set the stage for continuous progress.
And if you want to get strong all over, you’ll want to check out Integral Strength, our program designed to help you build strength that carries over into your everyday life.
You’ll get access to 8 weeks of structured workouts, all created to help you get stronger at your own pace. And it doesn’t matter where you’re starting from, because we give you beginner, intermediate, and variations of each movement.
Plus, you can take the workouts wherever you go since you will always have lifetime access.
Use Skill-Based Training to Build Practical Strength
Integral Strength is a skill-based strength program that helps you build practical skills and strength that carry over into your most important daily activities.
Troubleshooting Your Push-Up Form
Even though the push-up is a basic exercise, it can be quite troublesome for a lot of people. Here are some of the most common questions we’ve heard about push-ups, and our answers to those questions.
What if I can't even do one push-up?
No worries! That’s what this tutorial is here for. Start at the very beginning and be patient with yourself.
If starting on your knees isn’t doable, then start on your knees with your hands up on a stool or chair. And if you can’t do that, head to a countertop or have a wall in front of you, and work at an angle from your toes.
Keep your mind on your form, keep working on the exercise, and you will get stronger and work your way down to the ground for a full push-up.
Which muscles do push-ups work?
If you do push-ups correctly, pretty much all of your muscles are working! Your arms, shoulders, and chest are, of course, worked very hard in push-ups. But you are also using your abdominal and back muscles, and when you use the form we recommend, even the lower body is involved.
With the right approach, you can definitely make the push-up a full body exercise.
The form you teach seems to only emphasize the triceps, and not the chest at all. Won't my chest atrophy instantly if I use this form?
No. Your chest will be fine.
It’s true that keeping the elbows tucked in will place a greater emphasis on the triceps, but I promise you: it is impossible to lower yourself down to the ground and press yourself back up without involving the muscles of the chest as well. Physically impossible.
But the bigger question here is why you are doing push-ups at all.
Is it just to build a bigger chest? Or are you interested in building essential pressing strength for your health and longevity?
If the latter is even a minimal factor for you, then you’ll want to preserve the health of your joints for as long as possible. And the form we teach is a lot safer for the joints, so you can keep doing push-ups (and whatever else suits your fancy) for a long time.
What if my joints click/pop/snap when I do push-ups?
If you have any pain while doing push-ups, then you’ll need to stop and ask a qualified person to help you.
If you have clicks and pops that aren’t painful, then take another close look at your technique and see if that helps. It may not, but as long as you continue to be pain free, then you can continue on. You may need to reduce the range of motion in the exercise, but feel free to continue with a modified range of motion as needed.
Oftentimes, when you get stronger, these joint noises decrease.
Can I do these everyday?
Yes. Again, as long as your form stays intact, you can do these as often as you like.
I'm a woman, so obviously I can't do push-ups, right?
Wrong!
The progressions we shared above will help anyone (regardless of gender, age, or species–hey, maybe your dog wants to learn push-ups too) build the strength needed to work up to a full push-up.
Barring any injuries or other restrictions, push-ups are accessible for most able-bodied adults. Period.
How many push-ups should I do?
Just one perfect push-up. And then another. And then another. Until you can’t do any more perfect push-ups.
When you’re aiming for perfect form with each and every rep, by definition you’re not going to go to failure. You should feel fairly fresh by the end of a set.
I don’t care if you can do 50 push-ups if they’re sloppy. I’d much rather you be able to do 5 solid push-ups with good form. Just do as many as you can while keeping your elbows in, your shoulders in the right position, and your lower body tight and strong.
Why does it seem like every fitness article on the interwebz features a picture of someone doing push-ups with terrible form?
I have no idea, but I’m glad you noticed. Let’s hold ourselves to a higher standard.
Will push-ups replace the barbell bench press?
Nope. And we wrote about why trying to do bodyweight alternatives isn’t the solution. Instead, you should focus on doing bodyweight movements that are challenging and make progress over time. (read the article for our in-depth explanation)
