Contents: What to Expect / Front Lever Video Tutorial / Back Lever Video Tutorial / Troubleshooting
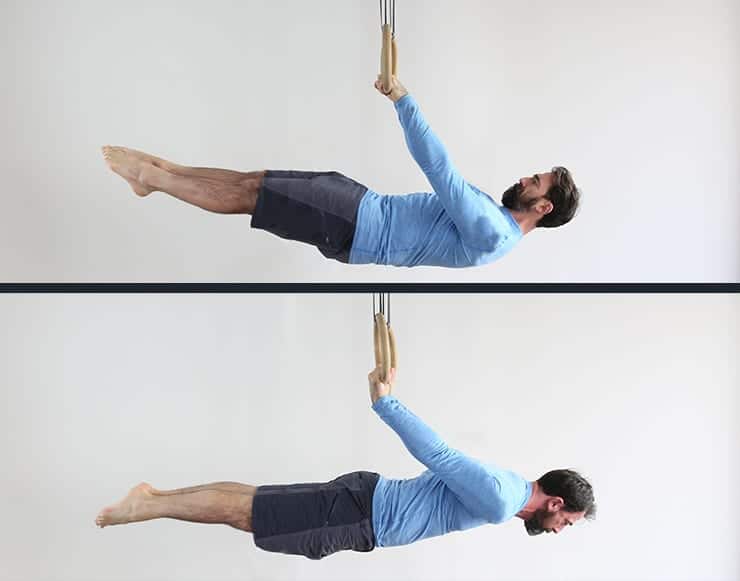
There are some skills that you see pictures of, and think, “That defies the laws of physics–must be photoshopped.”
The front and back levers on the rings are definitely in that category for most people if they’ve never trained toward them before.
But, while these are advanced skills that take a lot of dedicated effort to master, they certainly don’t defy the laws of physics, and if they’re appropriate goals for your level, you can absolutely get them with time and patience.
What to Expect About Training for Ring Levers
There are a number of differences with training for front levers vs. back levers, and each skill requires coordination of different muscle groups. But for all their differences, there’s a lot more they have in common.
Let’s Talk About Leverage
Go figure–levers are difficult because they’re putting you into a position with poor leverage. I won’t bore you with a detailed physics lesson, but here are the basics.
In front and back levers, the shoulder joint is the axis of rotation (if you don’t exert any force in the lever, your body will rotate around your shoulder, and well, you won’t be doing a lever anymore). The rest of your body is called the “lever arm.” The further away the lever arm is from the axis of rotation (the farther your feet are from your shoulders), the poorer the leverage and the more difficult the exercise.

One question that comes up with regards to leverage is whether height makes a difference.
A lot of taller people think they’ll never be able to achieve skills like ring levers, but that’s simply not true. Yes, the leverage for a taller person makes it more challenging to achieve front and back levers (a taller person’s feet are further away from their shoulders), but it will just take a bit more dedicated training.
We actually wrote an article on this very topic, so if you’re on the taller side, check it out!
Muscle Activation
In the front lever, you’ll need a great deal of strength in the muscles of shoulder extension, to keep your elbows locked out and arms in front of you. You’ll also need some serious core and back strength to keep your lower body elevated and in line with your upper body.
The back lever will emphasize the posterior chain muscles of the body. The lower back and hips are used strongly here, though you’ll also need good abdominal and arm strength to keep you in a nice horizontal line from your neck to your toes.
And of course, grip strength plays a big role in both skills.
Working on the front and back levers develops the coordination of varying muscle groups–pectorals, lats, biceps, triceps, abdominals, low back–that are sometimes at odds with one another in other actions. With the levers, you learn how to use them all together to make a solid position.
So, let’s look at how to learn both of these skills!
Front Lever Tutorial
There are many progressions and methods for training toward the front lever. The progressions I’ll show you here are not “better” than any others–there’s no magical formula for progressions–but I’ve seen them work well for many clients over the years.
In this video, I’ll break down this skill into bite-size progressions, so you’ll be set up to nail the front lever.
I’ve broken this skill down into four steps (each with two parts). Breaking difficult skills like the levers down into bite-size steps will set you up for success and help you achieve the skill with a lot less frustration.
- Tuck Front Lever (Negative and Pause Variations)
- Open Tuck Front Lever (Negative and Pause Variations)
- Straddle Front Lever (Negative and Pause Variations)
- Full Front Lever Slow Lower (Negative and Pause Variations)
You’ll notice that each step has two parts–the negative progression, where you focus on slowly lowering into the position, and the pause, where you work on maintaining that position. Often, people try to rush through each step and force the pause, but it’s important to solidify the negative portion first. Trust me, you’ll have a lot more success that way.
Back Lever Tutorial
Just like with the front lever, I’ll show you quite a few steps you can follow to get your back lever. For a lot of people, the back lever can actually be more accessible than the front lever, but either way, it’s just a matter of sufficient effort and time.
For the back lever, I’ve broken it down into four main steps, with each progression separated into a negative and a pause:
- Tuck Back Lever (Negative and Pause Variations)
- Open Tuck Back Lever (Negative and Pause Variations)
- Straddle Back Lever (Negative and Pause Variations)
- Full Back Lever (Negative and Pause Variations)
Take it slow, and be patient with yourself at each step.
Troubleshooting for Your Ring Levers Practice
You can expect to run into some bumps along the road when training for any advanced skill, and the levers are no exception. But with the right information and approach, you’ll have good success despite any hiccups.
Hand Position in the Back Lever
 The hand positioning with the back lever can be a bit tricky, but the two primary options–underhand or overhand grip–are both perfectly fine. It’s just a matter of what you want to emphasize.
In the overhand grip, the palms are facing forward when you grip the rings, and the emphasis will be on the biceps and elbows. With the underhand grip, the palms will be facing back when you grip the rings, and the stress is less on the biceps and more on the shoulder.
Choose the hand position you feel more comfortable with, and work on improving your strength there. Then, if you’d like a change, build your skills back up again with the other hand position.
Hitting a Plateau
As you work your way through these progressions, you may get stuck in your progress. Don’t be too concerned if that happens. If you hit a plateau, I recommend a couple of different approaches.
One option is to take a step back and work on a lower progression–one you can do with relative ease–for a while, to build up your confidence again. Another option is to take a break and work on something else for a couple of weeks. When you come back to your lever practice, you will likely be pleasantly surprised at your performance.
Pain or Limitations in the Shoulder Joint
 It’s probably pretty obvious that both front and back levers can place quite a bit of strain on the shoulder joint, especially if you’re not properly prepared.
If you have shoulder flexibility issues, it’s essential that you spend some time stretching and mobilizing those shoulders before you begin lever training. Our shoulder mobility routine can be practiced daily, or as a warm-up to your lever training.
As you work on your levers, if you experience any pain, please stop and re-evaluate. Maybe you need to drop down a level, or spend some more time focusing on your technique. And if you have persisting pain, please stop your lever training for now and go see a doctor. It is not worth risking a long-term injury just to get a cool skill on the rings.
The Benefits of Working Toward Advanced Skills
Being able to perform the front and back levers clearly demonstrates a high level of strength and control.
At GMB, we don’t think it’s necessarily the skill itself that matters. Rather, we’re after a mindful awareness of the journey toward it. The front and back levers are good examples of skills that require you to pay close attention to how you are moving, in order to fully develop the abilities you need.
With the progressions suggested in this article, you can make adjustments based on your body’s abilities, by changing leverages to gradually increase or decrease resistance as needed.


