A lot of people work out consistently and get pretty strong.
Then they try sitting in this one position and realize they’ve been working around their restrictions for years instead of addressing them.
I’m 53 years old. I had meniscus surgery to repair my knee. And I can comfortably sit in seiza for extended periods. So when half the comments on our videos say “I can’t do this because I have bad knees,” I get it.
I had bad knees too.
The position itself is straightforward. Getting there, and getting good at it, will teach you more about your body than most mobility routines ever will.
Try Seiza Right Now
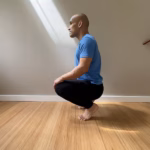
Get down to the ground and try to sit back on your heels. Notice what happens.
Can you get all the way down? Do your ankles feel tight? Can you sit there without wanting to bail out immediately? Now try standing up without using your hands.
Whatever just happened told you something useful.
Tight ankles, knees that don’t want to bend that far, a back that rounds the moment you sit down. These are restrictions you’ve been compensating for in every squat, every lunge, every time you get down on the floor with your kids. You just didn’t know it because you’ve gotten very good at working around them.
What Seiza Actually Is
Seiza (正座) is two Japanese characters: 正 (*tadashi*, correct) and 座 (*suwaru*, to sit). Correct sitting.
I lived in Japan for 28 years. I sat in this position through kendo practice, tea ceremonies, and about ten thousand meetings that went on way too long. For me it’s comfortable. But I watched plenty of other martial artists and expats struggle with it, and the reason was almost always the same: nobody actually taught them how to do it properly.
Here’s why it’s worth your time, even if you’ve never set foot in a dojo. Seiza naturally puts your spine in an upright, stacked posture with very little effort.
 Your Hidden Restrictions 1")
Try to round your back in a proper seiza. It’s actually hard to do, because the position of your pelvis won’t let you create the tilt you’d need to slouch. Compare that to cross-legged sitting, where the tendency to round forward creeps in after a few minutes almost every time.
The position also builds ankle flexibility and knee tolerance in ranges that most people never train. Those are exactly the ranges that deteriorate as you get older and spend less time on the floor. And getting in and out of seiza teaches you to use your posterior chain correctly, which carries over to squats, deadlifts, and every time you pick something up off the ground.
If you practice yoga, you might recognize this as similar to vajrasana (hero pose). The positions look alike, but the alignment details differ in ways that matter. In seiza, the heels point straight up and the sit bones rest on top of the heels, not between them. The knee spacing and foot position we’ll cover below keep the load going straight through the joints instead of torquing them sideways.
Proper Positioning: The Details That Actually Matter
These cues make the biggest difference, and most people get them wrong.
Sit bones on top of your heels
Your sit bones go directly on top of your heels. You’re sitting *on* your heels, not *between* them. This single adjustment changes a LOT about how the position feels. When you get it right, your weight travels straight down through a stable stack. When you miss it and let your hips drop between your heels, your back rounds, your knees take lateral stress, and the whole thing feels awful.
Honestly, I don’t know how this has gone under-acknowledged for so long. It makes a huge difference.
 Your Hidden Restrictions 2")
Toes together, heels straight up
Big toes touching. Heels pointing straight up, not angled outward. This keeps everything aligned and prevents the bow-legged position (*o-kyaku*) that comes from years of sitting with the heels splayed out. You see this a lot in older generations in Japan, and it’s a direct result of sitting with the butt between the heels for long periods.
Knee spacing
Aim for about three fists of width between your knees. That said, this varies by discipline and by your body. If two fists feels more stable and comfortable, that’s fine. If you’ve been doing martial arts with a specific standard, stick with what your practice requires. The key point is having enough space that your pelvis can settle into a neutral position.
 Your Hidden Restrictions 3")
How to Get There (If You Can’t Yet)
Most people reading this aren’t going to drop into a comfortable seiza on the first try. And the most common barrier is actually the ankles and feet, not the knees.
If the tops of your feet feel like they’re being crushed into the floor, or your ankle dorsiflexion won’t let you get your feet flat, that’s normal.
It takes time. Literally just time.
Pulse into it
Start in a kneeling position with your toes together. Use your hands on the floor for support (think of them as training wheels) and pulse backward toward your heels. Do ten slow pulses, sitting back as far as comfortable each time, and hold the last one for a few seconds.
You might have a significant gap between your butt and your heels. That’s fine. Just work the range you have.
Use a pillow
Place a pillow or folded towel under your butt so you can sit in the position comfortably without the full range demand. This lets you spend time in the end range, which is where the adaptation happens. You don’t need anything special. A couch cushion works.
A lot of frequent meditators use a cushion or bench for exactly this purpose, so that should clue you in that it’s very common to have a gap in your range here, but you can close it over time.
Build time gradually
Maybe you can sit for five seconds before it gets uncomfortable.
Cool, do five seconds. Tomorrow, try six.
This is a place where patience is your best tool. Do a little while watching TV, after a workout, while brushing your teeth. The accumulation of short exposures is what gets you there.
Work the toes-up position too
 Your Hidden Restrictions 4")
Flip your feet so you’re on the balls of your feet instead of the tops. This variation puts more demand on the bottom of the feet and the toe joints.
It’s a different kind of uncomfortable, and it builds flexibility and strength you’ll use every time you transition in and out of the position.
Practice both versions. Go from the toes-up position back to the flat-foot seiza as a stretch between the two.
Underrated: Moving In and Out of Seiza
Sitting still is only part of it. The real value shows up in how you get down to the floor and stand back up with control.
 Your Hidden Restrictions 5")
Sitting down with awareness
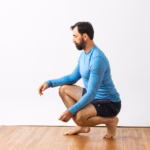
Start standing. Bring your attention to your posture and keep your chest tall. Slide one foot back, staying in contact with the ground, and feel the weight split evenly between both legs. Pull yourself down to the ground rather than just dropping. Let your knee make contact slowly, then bring the other leg back, toes together. Get your feet flat, then sit back.
Pay attention to the sit-back. You’re not pushing your hips backward. You’re almost falling backward, which forces your quads to work and control the descent right before your hips settle onto your heels.
Standing up with control
Drive the hips forward first, bringing them up over your knees so you can come up onto your toes. Load one leg, step the other foot forward, and find your balance. Keep your chest up the whole time. Imagine a string on the top of your head pulling you straight up.
The mechanics here matter.
Most people lean forward and use their back to stand up because their glutes are weak or disconnected. This movement teaches you to use your posterior chain correctly.
That carries over to deadlifts, squats, and every time you need to stand up from a low position.
 Your Hidden Restrictions 6")
Use static holds at your sticking points
If you struggle at a particular point in the sit-down or stand-up, just stop there and hold.
If the transition halfway down gives you trouble, pause at that position for a few seconds, then come back out of it. If driving the hips forward from the bottom is the hard part, hold that position with your hips just barely up.
You’re building strength and control in exactly the range where you need it.
Advanced Variations: Where This Goes
Once you’re comfortable sitting in seiza and can get in and out smoothly, there are some genuinely fun places to take it.
Seiza to jump
From the full seated position, swing your arms up while driving your hips forward explosively. Pull your feet underneath you and land in a squat.
 Your Hidden Restrictions 7")
The coordination between arm swing and hip drive takes some practice. If you’re working up to it, start by driving the hips forward, placing one foot out, and standing up from there. Get the timing of the hip explosion down before you add the full jump.
This teaches you to generate power from a compromised position. That’s exactly the kind of capability you need when you trip, stumble, or have to react quickly.
You might be able to squat 300 lbs, but if you can’t explosively get off the floor, you’re missing a layer of practical strength.
Seiza to shrimp squat
Drive the hips forward, place one foot out in front, and work toward a single-leg stand.
 Your Hidden Restrictions 8")
If pulling the back foot off the floor is too much right now, keep your toes in contact with the ground and let the back knee float just slightly off the floor. That’s still building the strength and control you need for the full movement.
Keep your posture tall through this one. The same string-on-top-of-your-head cue applies. Lean forward, let the string pull, and stand up through the single leg.
Seiza is quietly building the exact ankle flexibility and posterior chain strength you need for advanced single-leg work. Most people can’t attempt a shrimp squat because they lack the ankle mobility to keep their heel down in the bottom position.
Daily seiza practice addresses that directly.
Seiza to sumo squat
Drive with the hips to initiate, get your toes up, sit back on your toes, then load forward and stand up into a wide squat. The focus here is hip-driven movement. Let the hips lead everything and the transitions will be smoother.
Why Consistent Practice Works
Here’s the part that matters most.
Your body restricts movement to protect you from positions it considers dangerous.
If you haven’t sat on the floor in years, your nervous system has decided that deep knee flexion with ankle dorsiflexion is a threat. It tightens everything up to keep you out of that range.
Daily exposure in a controlled way teaches your brain that these positions are safe. The protective tension releases gradually as your nervous system builds confidence in the range.
 Your Hidden Restrictions 9")
Take 30 seconds a day. Sit in seiza while you’re watching something on your phone. Hold the toes-up variation while your coffee brews. Practice the stand-up once before you head to the gym.
The consistency matters more than the duration.
Common Questions
My ankles and the tops of my feet hurt. Is that normal?
Yes. Ankle stiffness and top-of-foot pressure are the most common barriers, more common than knee pain. If you haven’t spent much time with your feet in this position, the tissues need time to adapt.
Start where you are. Use the pulsing method with hands on the floor for support. Do a little bit each day and increase gradually. The toes-up variation can give the tops of your feet a break while still building the flexibility you need. Alternate between the two.
My feet keep cramping up.
Also normal, and the answer is time. Cramping happens because the muscles in your feet aren’t used to working in this range. Short, frequent practice lets those muscles adapt without pushing past what they can handle right now. If cramping hits, come out of the position, shake it out, and try again later or tomorrow.
I have a knee injury / knee pain. Should I do this?
If you have a medical condition or an acute injury affecting your knees, please talk to your doctor or physical therapist first. I’m a coach and a movement educator, not a clinician. I can teach you proper form and progressions, but I don’t know your specific situation the way your medical provider does.
If you have general stiffness or mild discomfort (no diagnosed condition), work very gradually using the pulsing approach and a pillow for support. The heel-under-sit-bones alignment is especially important for keeping the load off the knee joint. If it hurts, back off and try again with less range.
How long until I can sit comfortably?
I can’t give you a number, because it depends on where you’re starting. Some people with martial arts or yoga backgrounds get comfortable within a few weeks. If you’re starting from a significant gap between butt and heels, it could take months of consistent daily work.
The thing is, it doesn’t matter how long it takes. If you’re improving a little each day, you’re improving. That’s all that matters.
What about vajrasana (hero pose in yoga)?
Similar positions, different alignment priorities. In vajrasana, the hips often sit between the heels. In seiza, the sit bones rest on top of the heels with the heels pointing straight up. The seiza alignment keeps the load traveling straight through the joints and encourages the upright spinal posture that makes longer holds more sustainable.
If you already practice vajrasana, try the seiza alignment cues and see how they feel. You might find it addresses some of the knee or ankle discomfort people sometimes experience in hero pose.
Build the Foundation for Everything Else
 Your Hidden Restrictions 10")

Hi, I'm Ryan Hurst 👋
After a training accident ended his competitive gymnastics career, Ryan moved to Japan and competed in various martial arts until another injury made him reevaluate his priorities in life.
As Head Coach at GMB Fitness, his mission is to show everyone that you can define your own fitness as a sustainable and enjoyable part of your life. He loves handstands, dogs, and hiking.