Learning how to perform the Press to Handstand (PHS) is definitely a great party trick; but it’s much more than that.
The benefits extend far beyond the aesthetic appeal of the move itself: training fosters upper body and core strength, and cultivates total body flexibility.
Back in my days of gymnastics it was the move my coach Mark Folger required in order to try out for the boy’s team. To him, achieving the skill was a tangible demonstration that you had the work ethic required to handle the rigorous training.
This is a great example of what consistent steady training really means, it’s not just about meeting some arbitrary goals, instead it’s a big part of your personal development and commitment to your healthy longevity.
View this post on Instagram
The path to a perfect PHS is rarely a straight one; it’s filled with challenges, setbacks, and, yes, even frustrations.
But with the GMB Method, you have a reliable roadmap to guide you through. This method isn’t about quick fixes; it’s about moving at your own pace, acknowledging your body’s signals, and embracing the journey with all its ups and downs.
There’s hundreds of drills and exercises out there – taught by very good people! – but we’ve found a lot of value and benefit with the way we approach it and have helped people achieve this skill when they’ve stumbled and got stuck on their journey before. We use a combination of classic tried and true gymnastic methods along with our own special twists and adaptations for those of us a little farther on the path of life than teenage boys and girls.
Before You Soar: Key Prerequisites For Your Training
Before we dive deep, let’s talk about some foundational skills that can smooth your path to the Press to Handstand (PHS). Now, lacking these doesn’t mean you’re barred from PHS training! It’s just that having these skills in your arsenal can make the whole process a bit more, well, joyful.
The Non-Negotiable: Healthy Wrists
Given the pressure your wrists will be under, it’s crucial they’re not just strong, but also mobile and able to go into those deeper ranges of motion. This comprehensive article has helped a lot of people get their wrists strong and healthy.
Testing Your Readiness: A Slow and Controlled Frogger Is Your Litmus Test

And what’s a good benchmark for knowing you have good enough wrist strength and mobility? Try executing a Frogger with control and grace. It’s not just a litmus test for your wrists, but also a sneak peek into your shoulder strength. If you can comfortably load your shoulders, even when they’re extended beyond your wrists, you’re likely ready to embrace the PHS journey.
The Balancing Act: A Comfortable Handstand Sets You Up for Success
Next up, a sense of balance during a handstand can be a real game-changer. We’re not talking ‘hold a flawless handstand for 10 seconds’ skill, but a comfort level with inversion and a knack for holding it, even briefly, can be super helpful.
So, if the mere thought of a handstand sends you reeling, or the slow frogger seems like an insurmountable peak, it might be wise to first buff up these movements.
 Need guidance? Our Elements program is a fantastic place to start, and for the handstand aficionados, we’ve got a comprehensive guide just for you. Trust me, these resources are goldmines!
Full Step-by-Step Training Video
Here’s the full detailed tutorial, but please don’t just jump into it without heeding the essential foundational concepts we’ll go over in detail below.
And here’s a handy reference with all of the Lift and Negative movements. These are the choices that you’ll pair together in your Press to Handstand routine.
| Category | Movements |
|---|---|
| Lifts | - Hip Lift Set-Up - Straddle Jump to HS - Slow Frogger Toe Pull - Straight Leg Frogger Versions 1 to 4 - Frogger Stall - Wall Roll Up to HS |
| Negatives | - Wall HS Negative - Freestanding HS Negative |
| Combinations | - Wall Roll Up to HS + Wall Negative - Hip Jump to HS + Freestanding Negative - Full Press to HS |
| Key Cues | - Arm Drive - Hip Lift - Leg Abduction |
The Ascent Plan: Your Step-by-Step Training Guide
The GMB Method breaks down the journey into manageable chunks — lifts, negatives, and combinations. Lifts focus on elevating your body, building the strength and control necessary for the PHS. Negatives involve a controlled descent, enhancing your understanding of body positioning. And combinations? They’re where you start to see the magic happen, merging lifts and negatives to experience the full flow of a PHS.
Memorize These Three Key Insights: Indispensable Tools for Your Journey
Throughout your practice, three cues should be your constant companions:
- Arm Drive Pushing and “screwing” your arms into the floor for fully locked out elbows.
- Hip Lift. Pulling and compressing your hips into your core as well as up to the sky.
- Leg Abduction: Toe points and fully opening legs as you extend.
 These aren’t just simple words; they’re your secret weapons, integral to every movement leading up to a flawless PHS. They ensure your form stays impeccable, your movements precise, and your body in perfect harmony.
Though there are all kinds of drills and exercises you can do to get to the press to handstand, these three cues should be in your head throughout, so they can be fully ingrained when you work on your attempts to press to handstand.
We’ll talk more about this as we go on, but I’m telling you about them now because of how important they are. And also incredibly important is setting up your foundation correctly right at the start. Learning to build the proper base now will save you a lot of headaches later on.
Building Your Foundation: Two Keys to Success
We work on building your base with these two pivotal elements. Nail these and you’ll be more than halfway there.
- The Hip Lift Position
- The Wall Handstand Negative

Hip Lift Setup
Let’s kick things off with the foundation of your success: mastering the initial setup. This means honing your skills in the Hip Lift position.
If you’re not rock-solid and brimming with confidence in this stance, it’s going to throw a wrench in your Press to Handstand progression. Here’s the deal: your shoulders need to stack precisely over your hands, engaging your arms as if you’re screwing them into the ground. This creates that crucial scapular elevation.
Angle those fingers outward a smidge. It’s a game-changer, allowing for smoother internal rotation and keeping those arms staunchly straight.
Aim to ease into this setup and maintain it. The longer, the better. Stumble out of position, lose that scapular lift, or let those arms bend, and pressing becomes a mountain of a task. So, it’s all about building endurance in this pose, starting from a humble 5 seconds and climbing your way up to a robust 30.

Wall Handstand Negative
Next up on the agenda is diving into handstand work, particularly the Handstand Lower to Straddle — or as we affectionately dub it, the HS Straddle Negative.
You’ve got two main things to conquer here:
- Wall Handstand Straddle Negatives
- Freestanding HS Straddle Negatives
Here’s a heads-up: the gap between your palms and the wall is a delicate dance of strength and flexibility. You might need to inch those hands forward, but be mindful — the further they wander, the heavier the burden on your wrists. Counteract this by giving those fingers a slight outward twist, easing some of that pressure.

Freestanding Handstand Negative
Set your sights on a controlled descent, your legs gracefully sweeping towards the earth as you peel your back from the wall, vertebra by vertebra. All the while, pour your energy into a forceful push against the ground, sustaining that all-important scapular elevation. It’s all in the details, my friends!
Mastering the Art of Lifts: Explore the Power of Variations
Now let’s move on to the “Lifts”, and here is where we likely differ from most other press to handstand teaching. Because it’s crucial to view the exercises in the Lifts Group as variations rather than strict progressions. Get away from the thinking that you have to go from A to B to C in a very prescribed manner, needing to hit 60 seconds in a hold or somesuch before even daring to think that you can go to the next one.
That’s a load of crap.
This perspective matters because certain movements may feel more comfortable and natural for your wrists and shoulders. Instead of rigidly following a sequence, focus on the exercises that feel right for you, emphasizing mindful repetition and reasonable but progressive volume.
If you want the real “secret progressions” those are them.

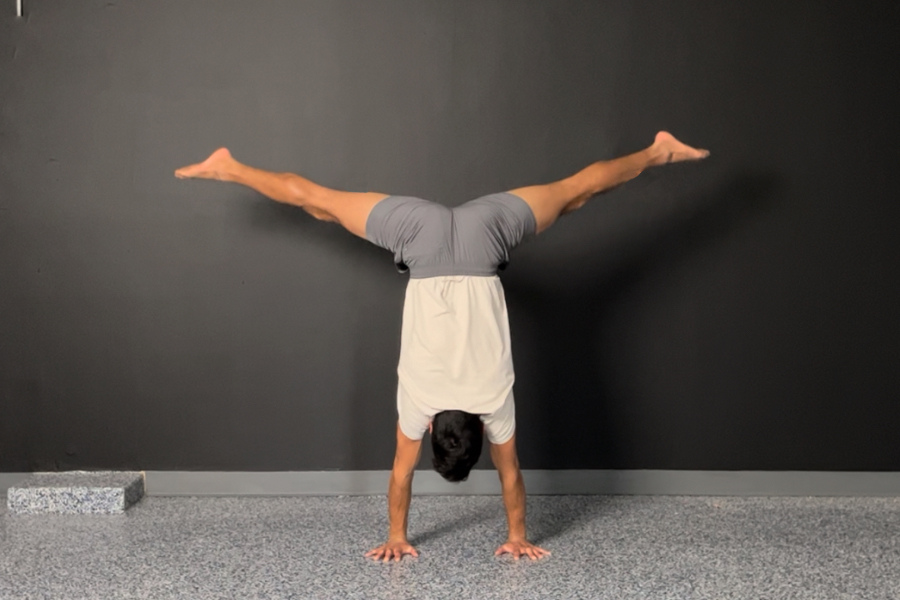
Straight Leg Frogger
And believe it or not, you could achieve a full Press to Handstand by consistently practicing the variations of the Straight Leg Frogger alone. This method has proven successful for numerous clients and remains my preferred approach for enhancing my own skills. However, exploring all available variations is beneficial, particularly if you’re not yet familiar with our Elements program. These exercises will fortify your shoulders, wrists, and core, diversifying your strength and boosting your confidence in various positions.
The Lift Group contains three sub-groups, each featuring movements that evolve from the previous one. Here’s a quick overview:
- Frogger: Progress from Slow Frogger Toe Pull to Frogger Stall.
- Straight Leg Frogger: Advance through Versions 1 to 4, each building upon the last.
- Wall Roll Up To Handstand: Adjust hand distance as you progress.

Wall Roll Up To Handstand
Remember, your training will pair a Lift with a Negative, and I’ll provide a detailed template for this below. Initially, I recommend starting with the Slow Frogger Toe Pull followed by the Straight Leg Frogger. These foundational exercises will develop the arm and compression strength essential for elevating your legs during the Press to Handstand. Then you can consider tackling the Wall Roll Up To Handstand once you’re confidently executing the more advanced Straight Leg Frogger variations.
Why You Can’t Ignore Compression Strength: It’s a Game-Changer
Compression strength is your unsung hero in this journey. It’s not just about having abs of steel; it’s about engaging your core in a way that supports the entire PHS movement. This unique form of strength is a vital part of the lift phase, helping elevate your legs and maintain balance. It’s a skill that traditional workouts rarely build, all the crunches in the world won’t help here. Focus on the cues shared for the lifts and really hone in gaining strength while in that compressed (folded) position.
The Seamless Merge: How to Integrate Lifts and Negatives Effectively
Now you’ll begin to merge separate skills into fluid, unified movements. This phase involves the seamless combination of Lifts and Negatives. Here are three combinations to get started with:
- Wall Roll Up to Handstand + Wall Negative
- Straddle Jump to Handstand + Freestanding Negative
- The Ultimate Goal: Full Press to Handstand
Before diving into these combinations, it’s crucial to hone each individual element independently, achieving a level of mastery that allows for smooth transitions and confident execution.
In these combinations, the focus should be on quality over quantity. Execute a single, mindful repetition, followed by a sufficient rest period to regain strength and composure. Continue with subsequent repetitions only when you feel robust and ready.
The moment your form starts to falter, recognize it as a signal to transition to the conditioning phase of your session, which is described below in the “Push” part of your routine.
Let’s get real: training for the Press to Handstand is no walk in the park, and your wrists will be on the front lines. It’s crucial not to leap into advanced variations or rush progression; patience is your ally here. Haste can invite not just frustration but also injury, and that’s the last thing we want on this journey.
 A pro tip to keep in your back pocket: angling your fingers outward is a little hack for wrist preservation.
Embrace the reality: mastering this skill is a challenge, and hitting plateaus is part of the game. Remember, progress isn’t a straight line. But staying true to your level and tuning in to your body’s signals will be your roadmap to long-term success.
Putting It All Together: The 5P Framework
The 5P Framework — Prep, Practice, Play, Push, and Ponder — offers a structured approach to your training sessions. It ensures you’re not just mindlessly repeating movements, but engaging with each session holistically. You’re warming up effectively, practicing diligently, exploring your capabilities, pushing your limits safely, and reflecting on your progress.
Preparation

Wrist Warmup Preparation
Begin with a thorough wrist, shoulder, and hip warm-up. You can certainly do more than what we show in the video above, but make sure to do at least what’s shown to start with. Then add or adapt as you see fit.
Then go to the the Hip Lift Set-Up Position, transitioning in and out of the stance for 30 seconds to prime your body.
Practice
Select a Lift movement that aligns with your skill level, aiming for at least 5 precise repetitions.
Allow substantial rest between reps, or alternatively, dedicate 5 to 10 minutes for focused, quality repetitions.

Slow Frogger Toe Pulls
Beginners can start with the Hip Lift Set-Up or Frogger Slow Toe Pull, advancing to more complex movements like the Straight Leg Frogger or Wall Roll Up as proficiency increases.
Opt for a Negative movement fitting your stage of training, again performing a minimum of 5 well-executed repetitions. Consider setting a timer for 5 to 10 minutes, concentrating on the quality of each rep. Your choices include the Wall HS Negative or the Freestanding HS Negative, depending on comfort and skill.
Play

Frogger Stall
This playful exploration is optional and based on your energy levels. Select a familiar movement, either a lift or a negative, and challenge yourself to execute it as slowly as possible, ensuring ample rest between attempts.
We define play as working right at the edge but still within your capabilities, at that fine balance where you feel challenge but not undue anxiety and fear. And of course where you are having fun!
Push
Here, the focus shifts to volume, balanced with safety. The initial variation of the Straight Leg Frogger is ideal for this phase.
Commit to continuous movement for one minute, followed by a minute of rest, repeating for up to 3 sets. Concentrate on a forceful push from the ground and a gradual forward motion of your feet, intensifying the engagement of your arms and core.
Pushing yourself here means as intense as you can make it while still maintaining a high quality of movement performance. Don’t sacrifice technique and skill, it doesn’t do you any good!
Conclude your practice with the 3 Point Bridge or a traditional Bridge position. Many find relief in a simple bar hang following their Press to Handstand efforts, aiding in recovery and relaxation.
Ponder
Reflect on your session’s outcomes. Were the chosen movements suitable for today? What deserves more attention in future sessions? How do your wrists and shoulders feel post-training?
It’s these moments after your session where you reflect and take an honest look at what and how you did that can propel you to progress. Don’t skimp out on this, grab a drink and a little snack and spend a few minutes going over the session in your head. You’ll be glad you did.
Remember, this journey is yours — personalize each session to fit your needs, listen to your body, and celebrate every step forward.
Dynamic Balance: Juggling the Press to Handstand and Other Skills in Your Routine
If you’re keen on mixing your PHS training with other skills, simplicity is your best strategy. Focus on a few key elements like the Hip Lift Set-Up, Straight Leg Frogger, and Wall Handstand Negatives during your practice. This focused approach ensures you’re not overwhelming your body and are giving each skill the attention it deserves.
- Hip Lift Set-Up
- Straight Leg Frogger
- Wall Handstand Negatives
After honing these skills, you can transition to other distinct exercises you wish to incorporate. However, be mindful of the intensity—starting off with less volume and intensity and progressively upping the volume of each exercise over time, as combining these can be quite demanding on the body. Slow and steady wins the race here!
Knowing When to Progress: Listening to Your Body
Progress isn’t about ticking boxes or rushing to the next level. It’s about honest self-assessment in understanding your body’s readiness, and recognizing when it’s time to move forward — or when you need to take a step back and consolidate your current skills.
Explore the movements, and if you can execute them without feeling undue strain in your wrists or shoulders, then you’re ready to move on. It’s really that simple. But the key is being honest with yourself both in relation to going too fast or unnecessarily holding yourself back.
There’s no magic number of repetitions or specific duration to master before progressing. The key lies in developing a true understanding of your body and it’s needs.
 It’s natural to encounter days when your body doesn’t seem to cooperate, and you feel weaker than usual. When this happens, it’s wise to adjust your routine. Focus on movements that feel more comfortable and aren’t overly demanding. Persisting with these adjustments not only aids in honing the mechanics necessary for a successful Press to Handstand but also deepens your ability to sustainably continue and progress in every physical endeavor.
The Sky’s The Limit: Your Mastery Awaits
Mastering the Press to Handstand is more than achieving a physical feat; it’s an example of improving self-development, resilience, and profound body awareness. It’s a long road, undoubtedly, but every step is worth it. So embrace each moment, celebrate your victories — no matter how small — and remember you’re doing this for yourself.
Boom there it is! You’ve now gone through everything you need to get the Press to Handstand.
Want To Fully Immerse Yourself In Press To Handstand Training?
Feeling like you’d benefit from more details and feedback on your performance? You’ll love our upcoming Press to Handstand Course.
This even deeper dive into the PHS contains everything from fortifying foundational strength to refining technical subtleties, available in a self-paced format or a six-week guided program with personalized feedback from our expert coaches.
Get on the PHS Course Waiting List, and I’ll send our handstand tutorial and cheatsheet to work with until it’s ready.
You’ll wanna use this routine to tighten up your handstand so you can be ready to make the best possible progress on your press handstand.
Sign up above to download our popular “from scratch to solid” handstand tutorial and cheatsheet, and you’ll also be in the first group of people to be notified when we offer the next Press to Handstand course!

Hi, I'm Ryan Hurst 👋
After a training accident ended his competitive gymnastics career, Ryan moved to Japan and competed in various martial arts until another injury made him reevaluate his priorities in life.
As Head Coach at GMB Fitness, his mission is to show everyone that you can define your own fitness as a sustainable and enjoyable part of your life. He loves handstands, dogs, and hiking.