Strong shoulders can support your full bodyweight at any angle. Hands on the floor, hips in the air, weight shifting from arm to arm, and nothing complains. That capability carries over to just about everything your shoulders do for you, from pressing your kid overhead to hauling bags of soil across the yard.
Getting there takes two things: strength, and the coordination to use that strength under load.
The coordination part is a skill you build through practice, the same way you’d build a golf swing or a guitar riff.
Quick note: If your shoulders feel more tight than weak, our shoulder mobility guide has a self-assessment to find exactly what’s restricted. Start there instead. And if you’re a lifter looking for prehab to keep your shoulders healthy under the bar, our shoulder prehab routine covers that.
What Building Shoulder Strength Through Movement Looks Like
Here’s the whole progression in one video: all six movements in order, the cues that matter for each one, and the level that comes after them.
That’s me at 53, with more than 40 years of gymnastics and martial arts behind me, shoulder surgeries included. I still train every day, and this kind of positional work is a big part of why my shoulders can keep up.
Three cues from the video apply to every movement on this page:
- Push down and away from the floor. Hips high, shoulders active, in every position. That drive is what loads your shoulders and builds the strength.
- Elbow pits face forward. When your elbows bend, they point back toward your toes instead of flaring out to the sides. Flared elbows put the stress in the wrong place, and it’s the most common mistake in this whole progression.
- Work each move up to about a minute. That’s the benchmark. When you can own a position for a full minute, you’re ready for the next one.
Here’s the full progression at a glance:
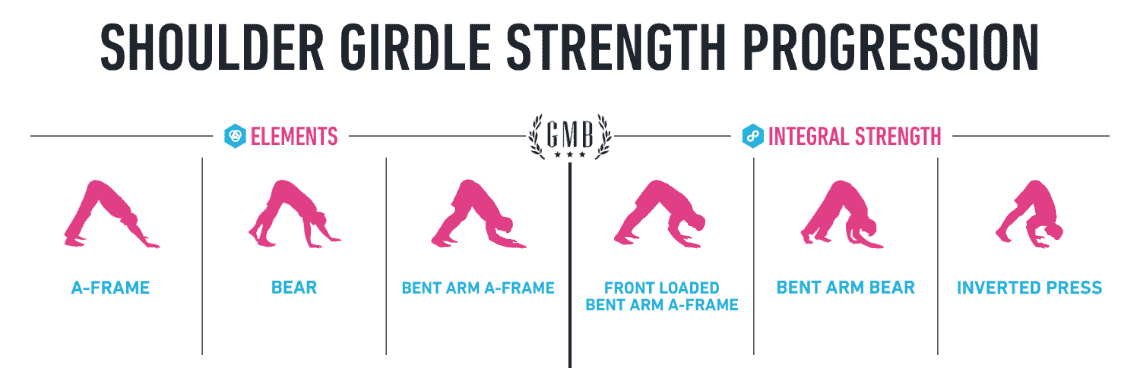
Six Movements That Build Shoulder Strength, From Beginner to Advanced
These movements come straight out of our programs Elements and Integral Strength, and they build on each other so you can progress steadily. Training them helps you:
- Improve your posture
- Relieve and improve shoulder and back pain
- Gain more control over your entire body
- Get more flexible
All six fit in a small area to work from, about the size of a yoga mat.
Start with the A-Frame. If it feels comfortable right away, keep moving down the list until you find the one you struggle with, and practice that one. Getting comfortable adjusting like that is one of the keys to consistent progress.
Here are the 6 movements we’re covering:
1. The A-Frame Builds Foundational Shoulder Stability
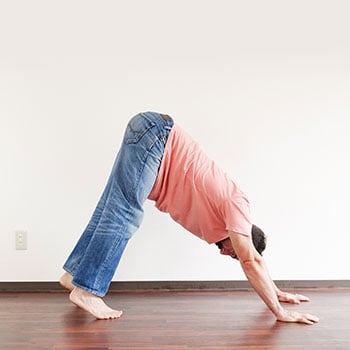
 The A-Frame is where everyone starts. It gets you comfortable supporting your bodyweight with your arms and shoulders.
Start from your hands and knees, then push your butt up into the air as high as you can. Don’t worry if your heels don’t reach the floor. Getting into a position you can hold is the goal, and the rest improves with practice.
Push down and away from the floor the whole time, driving your hips up. Hold it for 30 seconds to start and work up to a minute.
Once that feels comfortable, shift your weight slightly forward onto your hands. When you can hold the front-shifted version for a full minute, you’re ready for the Bear.
2. The Bear Walk Challenges Your Balance and Stability in Motion
 The Bear takes the A-Frame and puts it into locomotion. One hand forward, opposite foot forward, and keep going.
Don’t just go forward. Walking backward is where the real shoulder strengthening happens, because you have to push away from the floor with your hands the entire way. Exaggerate that push.
Keep your hips high and don’t let your shoulders drop. You want your shoulder blades elevated, pressing down and away from the floor with every step. Each step also shifts your weight from shoulder to shoulder, which trains balance and body control right along with the strength.
Work up to a minute of moving, forward and backward.
3. The Bent Arm A-Frame Makes Your Muscles Work Harder
 Bend your elbows and everything changes. Now your shoulders and arms work the whole time to keep you off your face, and things get a little spicy.
The elbow cue decides everything here. Rotate your elbow pits to face forward, so your elbows point back toward your toes when they bend, and start with just a small bend. Bending with flared elbows puts the load in the wrong place and tends to aggravate shoulders, and people usually can’t tell they’re doing it.
Once you can hold the position for 60 seconds with your elbows in and no shaking, move on.
These first three movements are all part of our Elements program. 👇
If the First Three Feel Like Work, Start With Elements
Elements takes you through these foundational positions with clear progressions and benchmarks, so you always know which version to practice and when to move up. You’ll build the strength, flexibility, and control that harder bodyweight skills are made from.
The Advanced Progressions: Adding Load and Range
If the first three felt comfortable, these next three will give your shoulders plenty to work on.
4. The Front Loaded Bent Arm A-Frame Increases the Load
 Same bent-arm position, now with your shoulders traveling up over your hands.
This is a lot harder than it looks, and you have two dials for adjusting it: how far forward you take your shoulders, and how much you bend your arms. The goal over time is shoulders over hands with your arms bent as low as you can control.
Keep the elbow-pit rule from movement 3, and work on holding it for a minute.
5. The Bent Arm Bear Builds Pressing Strength You Can Use
 The Bent Arm Bear takes the Front Loaded Bent Arm A-Frame and puts it into motion. One hand forward, one foot forward, elbows pulled in the entire time.
Walking under that load keeps your shoulders active every second. Your serratus and traps stabilize your shoulder blades, your rotator cuff stays engaged, and your lats and abs connect shoulder to hip, which is where pressing power comes from. Think of it as a full-body isometric in motion.
Use the same two dials as before, adjusting your forward lean and your height. And a small tip from the video: turn your fingers slightly out to the sides. It takes stress off your wrists and helps keep your elbows from flaring.
Treat it as practice. Take slow laps around your living room, 20 to 30 seconds at a time, working up to a full minute with breaks whenever your form starts to slip. If pressing has felt rough or uncertain for you, this is a low-risk way to rebuild coordination and confidence, and the carryover reaches every press you do: push-ups, kettlebells, barbells, all of it.
6. Inverted Presses Complete the Progression
 Once you own the Bent Arm Bear, start pressing your bodyweight down and back up from that hips-high position, the same basic action as a push-up tipped toward vertical.
Keep your shoulders as far forward over your hands as you can, and lower yourself with attention: elbows in, breathing steady, as slow as you can manage. Hips stay high the whole time. If they start to drop, you’re going too low, so shorten the range and keep them up where they belong.
Give the lowering as much attention as the press. Controlling yourself down tells you right away whether you own the movement, and the eccentric builds strength even before you can press back up.
In the video I call the handstand push-up level seven, and these six movements are how you earn it. The path runs through the handstand and eventually handstand push-ups, if you want to take it that far.
These advanced movements come from our Integral Strength program. 👇
When the First Three Feel Comfortable, Integral Strength Is Next
Integral Strength builds the bent-arm work above into full pressing strength through skill-based progressions, with clear benchmarks at every level. You’ll develop strength you can use anywhere, with shoulders that hold up to whatever you ask of them.
Strong Shoulders Pay You Back Every Day
Now we’ve heard:
“Wow, I couldn’t do this in a million years.”
We hear it a lot, and the evidence says otherwise. We’ve taken thousands of people through this exact system. Some felt too stiff, some felt too old, and they got started anyway and surprised themselves with how far they went. Here’s a handful of people describing it in their own words.
You may never care about level seven, and that’s fine. The strength and stability you build on the way is the real payoff. Long days hunched at a desk leave shoulders stiff, tight, and sometimes cranky, and these positions are how you push back.
Think about what your shoulders do for you: picking up your kids, throwing a ball with your friends, lugging dirt for that garden you started. Strength that can support your whole bodyweight makes all of it feel lighter.
If the first three movements feel challenging, Elements is where you start. If you can handle them comfortably and want the advanced progressions, Integral Strength is the next step. Either way, pick your entry point and get your hands on the floor this week.

Hi, I'm Ryan Hurst 👋
After a training accident ended his competitive gymnastics career, Ryan moved to Japan, where he spent close to 30 years training and competing in judo, kendo, and other martial arts until another injury made him rethink what training is for.
As Head Coach, he leads program design and teaches every week on our YouTube channel. His book, Stay On The Mat Forever, is aimed at helping you keep training for decades. He loves handstands, dogs, and hiking.