Need a dependable ring training setup?
You’re in luck. I figured out a way to build a sturdy frame to fit all my ring training needs, and I’m here to share my experience with you.
Finding a place to hang gymnastic rings is probably the biggest problem people run into when looking to get started with ring training.
If you have the space available, and the time and patience necessary for the type of project I describe below, building your own rings frame is really the best option for hanging your gymnastic rings.
It’s the best option for adjusting the setup based on your particular specifications, and for the convenience of training in your backyard.
The Construction Plan I Followed for My Rings Frame Setup
I originally started this project after googling how to create a simple pull-up bar station.
One of the first things I read was a post on how a person used pipes and pipe fittings that were supported in buckets of concrete, placed in holes in the ground. Having had no experience in any of this, I thought, “well, that seems simple enough!”
Alas, simple is not always the best.
I spoke about this idea with Andy (you know, the boss man here at GMB), who quickly stated “yeah, that’s not gonna work.” So, after a little bit of email brainstorming with Andy and Ryan, voila! We came up with a more solid plan.
The plan consisted of a fairly simple construction involving two posts, a pipe, a post digger, a bunch of cement, and a lot of sweat and energy on my days off from work.
The Materials You’ll Need for This Plan
- Two 12 feet long 4 x 6 posts
- One 10 foot 2 inch diameter galvanized pipe
- 10 bags of quick set cement
Assembling the Rings Frame
Once you’ve returned from your local hardware store, it’s time to get to work. Follow the five steps below for a simple, easy-to-use rings frame.
Here is a video of the whole process, with step-by-step instructions to follow:
| Assembly Step | Instructions |
|---|---|
| Step 1 - Dig holes for the posts | • Dig two holes in the ground, approximately eight feet apart. • The holes should be about three feet deep, with a diameter of 12-18 inches each. • If your posts are taller, say 16-feet, you will want to dig a hole about four feet deep. • A hole that’s about 1/4 of the length of your post will be very stable. |
| Step 2 - Drill holes in your posts | • Using a spade bit or hole saw (I used a combination of both), drill through the tops of the beams. • Make sure to drill the hole in the center of the beam, leaving a couple of inches at the top. • The spacing is important for maintaining the integrity of the wood. |
| Step 3 - Secure the frame | • Insert the galvanized pipe into the holes you just drilled into the top of the posts. • As you can see, we secured the pipe with twine to keep the pipe from sliding in and out. • Another option is to drill locking pins on the inside of the posts for a cleaner look. |
| Step 4 - Lift the frame and put it in place | • You will definitely need help to lift and place your frame into the holes you dug earlier – the frame is pretty heavy and unwieldy. • We used a couple of concrete blocks to support the frames while we made sure they were level. • Mix the concrete and pour it into the holes once you make sure the frame is level. |
| Step 5 - Let everything set | • Once everything is in place, wait at least a couple of days before using the frame. • We gave the concrete a couple days to set, and we were quite pleased with the sturdiness of the frame. • When the concrete is set, hang up your rings and try it out! |
Further Thoughts on Taking This Route
Be prepared to allocate more time for digging than you’d think!
I was stymied by various roots and rocks that made for a not-so-pleasant couple of hours, when perhaps it would have taken half that time with more pliable ground!
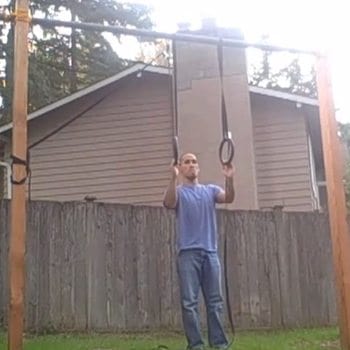 I had originally wanted 16-foot-long posts, but they were not available at the hardware store. This would have given me about a 12 foot height vs. a slightly below 9 feet height frame.
This lower height is absolutely fine for all of the ring exercises I am performing, however, a higher frame would mean I could do them all from the starting position of being off the ground with arms and legs fully extended, and still have enough head clearance for the full shoulder stand (and eventually handstand) exercises.
Overall I am very happy with how this turned out and we plan to gussy it up a bit, with some playground wood chips and some swing harnesses for my twin toddlers.
Follow these simple steps and after a few hours of work, you can have your very own homemade rings frame.
Get Going!
If you’re rearing to go after reading this post, good for you!
Once you have a place to hang your rings, whether it’s using this method, or one our many recommended ideas, there is no excuse for not getting started with rings training today!
Take advantage of all our other resources for getting the most out of training with the rings.
