Are you struggling with your overhead squat? If so, you’re not alone. Go to any CrossFit® gym around the world, and you’ll see people having a hard time with this movement.
That’s common because there’s a lot to get right from a technical perspective. And since it’s such a complex movement, it’s hard to grasp what you should be working on if you don’t know what limitations you have.
So regardless of whether you’re struggling with your squat depth or locking out the overhead position, we’re going to cover all that’s needed to improve your mobility for the overhead squat.
Why Mobility Is A Limiting Factor For Many
The overhead squat is difficult because you’re balancing a loaded barbell overhead and then you have to squat down while maintaining a strong core and tight shoulders.
Many athletes have the strength for this movement but are lacking in the mobility to get into the ideal position. Have a quick look at Sara doing the overhead squat to see what great technique looks like:
There’s a lot going on here from a mobility perspective, and we’re going to break everything down below.
But every time we start talking about mobility to help you lift better we get lots of responses like this one:
🗣 “I only have a few hours a week to train. I don’t have time for mobility work.”
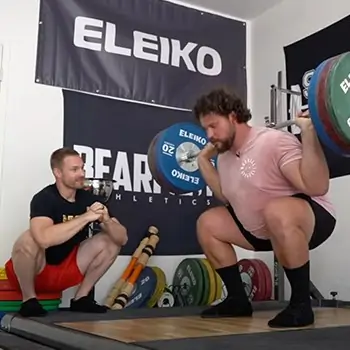 Listen, we get it. Mobility work doesn’t seem as sexy as actually moving big weights around. It can feel like taking a step backwards in your training.
So we reached out to Dr. Aaron Horschig, founder of Squat University, who’s helped everyone from busted up CrossFitters to the literal World’s Strongest Man improve their lifts.
We asked for his take on the importance of mobility work for the overhead squat. Here’s what he said…
There’s a famous saying, “It is necessary sometimes to take one step backwards to take two steps forward.” This advice applies directly to how we train and build our body. Within the walls of the gym the one movement that is the truest expression of human mobility and balance is the overhead squat. Unfortunately it also is one of the most difficult for many to perform with optimal technique.
However, in my experience working with gym goers (from the 40-year-old CrossFitter to Olympic Medalists in Weightlifting) those who have patience and work tirelessly on perfecting the basics are often the ones who have the best lifts, the least amount of injuries and have the greatest longevity. Simply put, taking time to improve your mobility and master what many would consider to be the fundamentals IS WORTH IT. IT IS sexy. IT IS what pays off in the long term.
Dr. Aaron HorschigFounder, Squat University
He’s right. If you want to keep improving your overhead squat without getting stuck or injured, you have to nail the basics like making sure your body can safely get in to and out of the necessary ranges of motion.
Now let’s take a look at exactly how to build the mobility your body needs.
Assessing And Improving Lower Body Mobility
The first step when improving your overhead squat mobility is to use an assessment to learn what needs to be worked on right now.
This way, we can help you uncover exactly what you should start with and how to use our suggestions immediately to make progress.
A solid bodyweight squat is your foundation for all your loaded squats. This article teaches you efficient strategies to get deeper and more comfortable in the basic bodyweight squat.
To start, we’re going to walk you through a squat assessment to highlight any areas that are tight or inhibited, and then we’ll tell you how to fix them.
For reference, here’s GMB Trainer Sara showing us what a great overhead squat looks like:
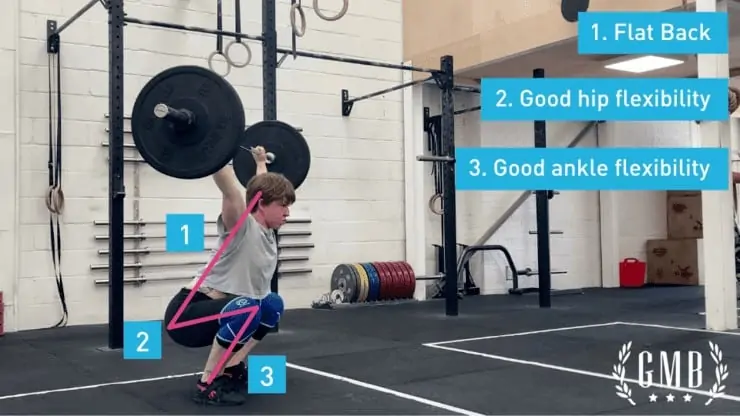
See the straight lines?
She has enough flexibility in her hips to sink down into a deep squat, which allows for her knees to push out over her toes safely.
You’ll also notice she has great ankle mobility, particularly dorsiflexion (think of pulling your toes up toward your shin), that allows for her heels to stay on the ground.
And her back is straight, with arms extended overhead without any restriction.
Follow along with Sara here and assess your own squat to see what you need to work on:
Now that you’ve been through the assessment, ask yourself these questions to see what you need to improve.
- Does the squat feel tight or comfortable?
- Is your chest up?
- Is your back flat or rounded out?
- How far can you comfortably squat down?
- Are your knees caving in or are they slightly turned out?
Based on your answers, rate yourself on a scale of 1-10.
10 being “I can sit here all day” and 1 being the most challenging for you.
See this chart to help you make sense of the ratings 👇
| Squat Rating | What to do next: |
|---|---|
| 1-4 | This suggests the squat is challenging. Pay attention to what areas feel tight or where you're inhibited the most. That will tell you what needs the most work and you should address those areas with specific exercises first. |
| 5-8 | This rating suggests you can get into the position, but you may not be as comfortable as you'd like. Instead of working on specific exercises, you should be working your way into the position deliberately trying to improve your strength and range of motion. |
| 9-10 | If you rate yourself a 9 or 10, you're pretty solid, so you don't need to work on this too much outside of regular practice. |
Now that you have your rating, think about what you’re actually struggling with.
People usually feel tightness or restriction in their hips, lower back, and/or feet/ankles. Make note of what is uncomfortable for you, and then use the following sections to work on them specifically.
😢 My hips are tight, restricted, or painful when squatting.
You can’t squat well with tight hips, so if your assessment hinted that you need to work on them, here’s how to go about it with two specific stretches:
- Lying Hip Rotations
- Frog Stretch
1. Lying Hip Rotations
Whether you sit a lot during the day, or just don’t spend much time squatting (outside of working out), this stretch is sure to give you some instant relief and will go a long way in helping free up any tightness in your hips.
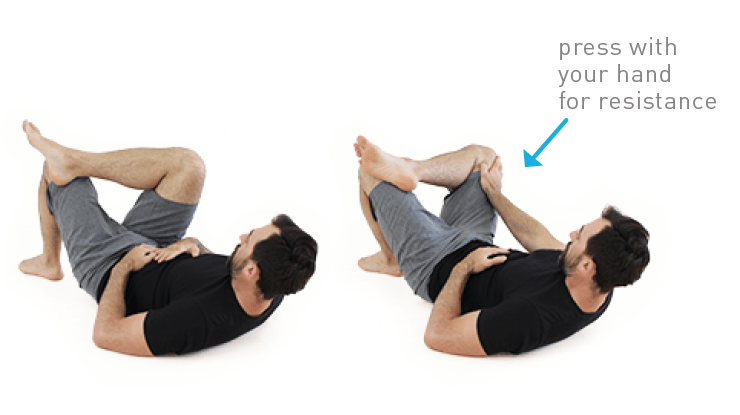
Here’s how to do it:
- Lie flat on your back with both knees bent.
- Cross an ankle over the opposite knee.
- Move in and out of the stretch by rotating the hip in and out (use your hand for extra range of motion).
- After 8-10 reps, use your hand to press into the knee and hold for 30 seconds.
Do 2 sets of 8-10 reps per side and then move onto the frog stretch.
2. Frog Stretch
Many of us are stiff in the groin, so we use this stretch to open up our tight adductors. And once you get more flexible using this stretch, squatting becomes much more comfortable.

If you’re tight, this stretch could be tough for you, so take it slow and don’t force a position you’re not ready for just yet. The goal is to move your body in and out of the stretch gradually.
You’re aiming to squeeze the knees together while you rock backward and relax as you rock forward. After 2-3 repetitions you can relax into the stretch for upwards of a minute.
Here’s how to do it:
- Set up on your hands and knees, bringing your knees as far apart as you comfortably can.
- Slowly and with control, rock back and forth in that position.
- Make sure the balls of your feet remain on the ground, toes pointed outward.
Do 2-3 reps rocking back and forth, then spend time relaxing into the stretch for 30-60 seconds at a time. You can do 2-3 rounds.
If you’re ready to unlock more flexibility in your hips, try our effective hip mobility routine. Thousands of people have used it to deepen their squat and reach new ranges of motion for more athletic movement.
Another way to actively work on your squat depth is using the Frogger.
Once you’re comfortable with the 2 stretches above, we suggest adding the Frogger to your training for better squat mobility.
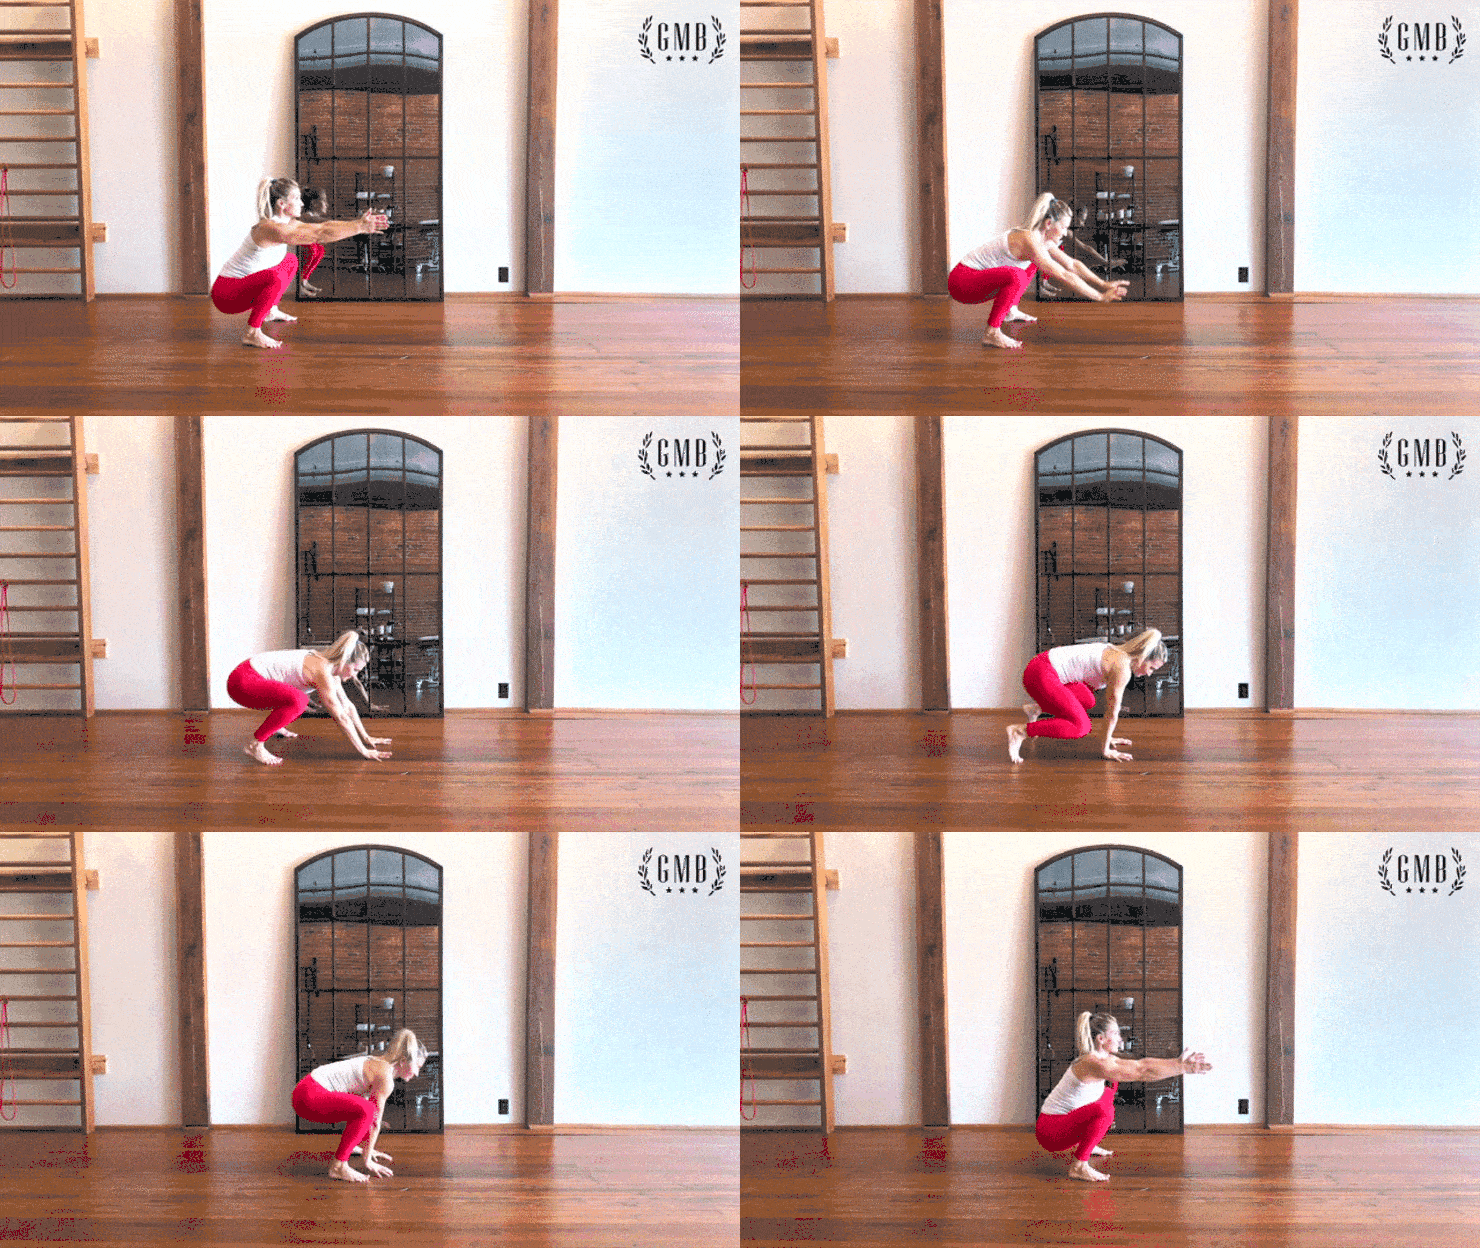
This exercise is a dynamic one that gets you into the deep squat position while moving your body through space. It’s a nice alternative to static squat holds for time.
Set a timer for 2 minutes and work through the movement at a pace that is comfortable for you.
And when this gets easier, you can add 1 minute until you get up to 5 minutes of the Frogger. And by this time, your squat should feel pretty solid.
😖 My lower back rounds at the bottom.
If you notice your lower back rounds or gets fatigued when squatting, working on your hip flexibility will help, but you should also work on your hamstring flexibility because it can be a limiting factor for squat depth.
In this video, Jarlo shows you how to stretch your hamstrings in a dynamic way. You only need a chair or a bench and you can work on one leg at a time.
The goal with this stretch is not to hang out in a boring static position for 30-60 seconds and call it a day.
Instead, start with one side and spend 2-3 minutes working the stretch to see how much range of motion you can access after a little work.
😡 My calves and ankles are tight.
This is a common problem, so the first thing you should do is assess each ankle independently, because most likely you’ll have varying ranges of motion in each ankle.
This is especially true if you have a history of ankle sprains or other foot injuries.
Here, Sara walks you through how to determine your level of ankle mobility:
When doing this, pay attention to the following:
- Do you notice any discomfort in your feet or ankles?
- Make note of any pinching as you aim for a deeper stretch.
- Pay attention to any discrepancies in flexibility.
Being mindful of what’s going on will help you determine what to work on.
The best way to improve the range of motion in your ankles and calves is to get started with these two exercises:
- Standing calf stretches
- Ankle mobilizations
View this post on Instagram
Your feet and ankles might need a little extra attention, so if you want to work more on your flexibility, we have an in-depth resource you can use to free up any tightness you have.
Another way to actively increase ankle and calf flexibility is through the 🐻 Bear Walk.
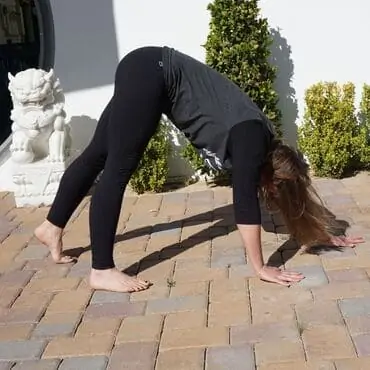 We use the Bear as part of our Elements program that can be done solo, and some athletes use the Bear Walk as a part of their warm-ups and dynamic work before lower body training to open up their ankles.
Now that we’ve covered lower body mobility, let’s talk about your shoulders and upper back.
Assessing And Improving Upper Body Mobility
Many people don’t have the active range of motion in their upper back and shoulders to hoist a barbell over their head, much less squat down with it. It’s especially true if you’re working a desk job as lots of seated work makes our upper bodies stiff.
You can stretch your shoulders and upper back, but it’s best to start with an assessment to see what needs work. Sara walks you through a short upper body test below to gain some insight on where you are:
When doing this, think about the following cues:
- Tuck your pelvis and widen your knees.
- Push your chest forward and dip into a J-curve.
- Imagine that you’re lifting your chest toward the chair or bench.
- Hold the position and rate yourself on a scale of 1-10. 10 being the easiest and 1 being the most difficult.
Here’s another chart to help you make a decision on what to work on:
| Upper Back Rating | What to do next: |
|---|---|
| 1-4 | This suggests the overhead position is challenging. Pay attention to what areas feel tight or where you're inhibited the most. That will tell you what needs the most work and you should address those areas with specific exercises first. |
| 5-8 | This rating suggests you can get your arms into the overhead position, but you may not be as comfortable as you'd like. Instead of working on specific exercises, you should be working your way into the position deliberately trying to improve your strength and range of motion. |
| 9-10 | If you rate yourself a 9 or 10, you're pretty solid, so you don't need to work on this too much outside of regular practice. |
Based on how you rated yourself, it’s time to think about the next steps.
Since the overhead position requires a good amount of flexibility overall, we want to approach this from a place that opens up your shoulders and chest, while also getting you familiar and comfortable with your arms overhead.
Here are two stretches we recommend for your chest and shoulders:
1. Prone Bent Arm Chest Stretch
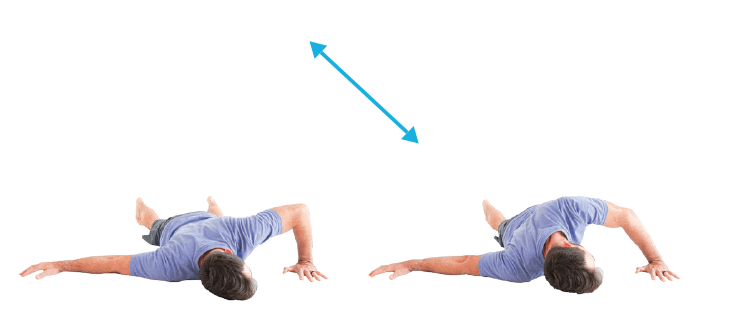
This stretch is good for opening up the chest and front shoulder. It’s best to work on one side at a time and really focus on the stretch.
- Lie down in a prone position (on your stomach) with one hand flat on the floor and your other elbow bent.
- Press your weight with the bent arm toward your hand to feel a stretch in your chest.
- Once you’re in a comfortable position, move in and out of the stretch 10 times. At the 10th rep, hold the position for 30 seconds.
Repeat this sequence 3 times for each arm.
2. Tall Kneeling Arm Raises
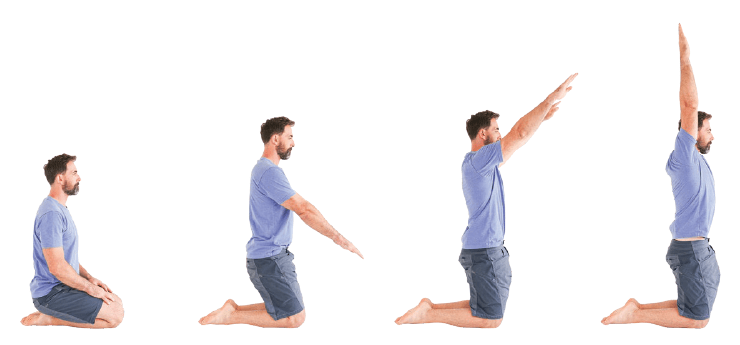
This stretch is good for opening up the shoulders for the overhead position and it engages the hips too.
- Start in a seated position with your feet under your butt.
- As you raise your arms up overhead, lift your hips to get into a full extension.
- Now you’re in the “tall kneeling” position at the top of the movement with your arms straight up.
- Make sure that you’re not arching your back as you open up the shoulders.
Only lift your arms as high as you can while maintaining a straight back. Do 5 repetitions of this stretch and hold for 15-30 seconds on the last rep.
If you want to loosen your shoulders even faster, try our full shoulder mobility routine. It’s helped thousands of people ease tightness and open up the range of motion they need.
Now, to think about mimicking the overhead position, a great way to do this is through inversion by getting on your hands. We achieve this through animal movements, such as the 🐻 Bear, 🐵 Monkey, and 🐸 Frogger.
We recommend starting with the Bear Walk and exploring other movements as you get more comfortable on your hands.
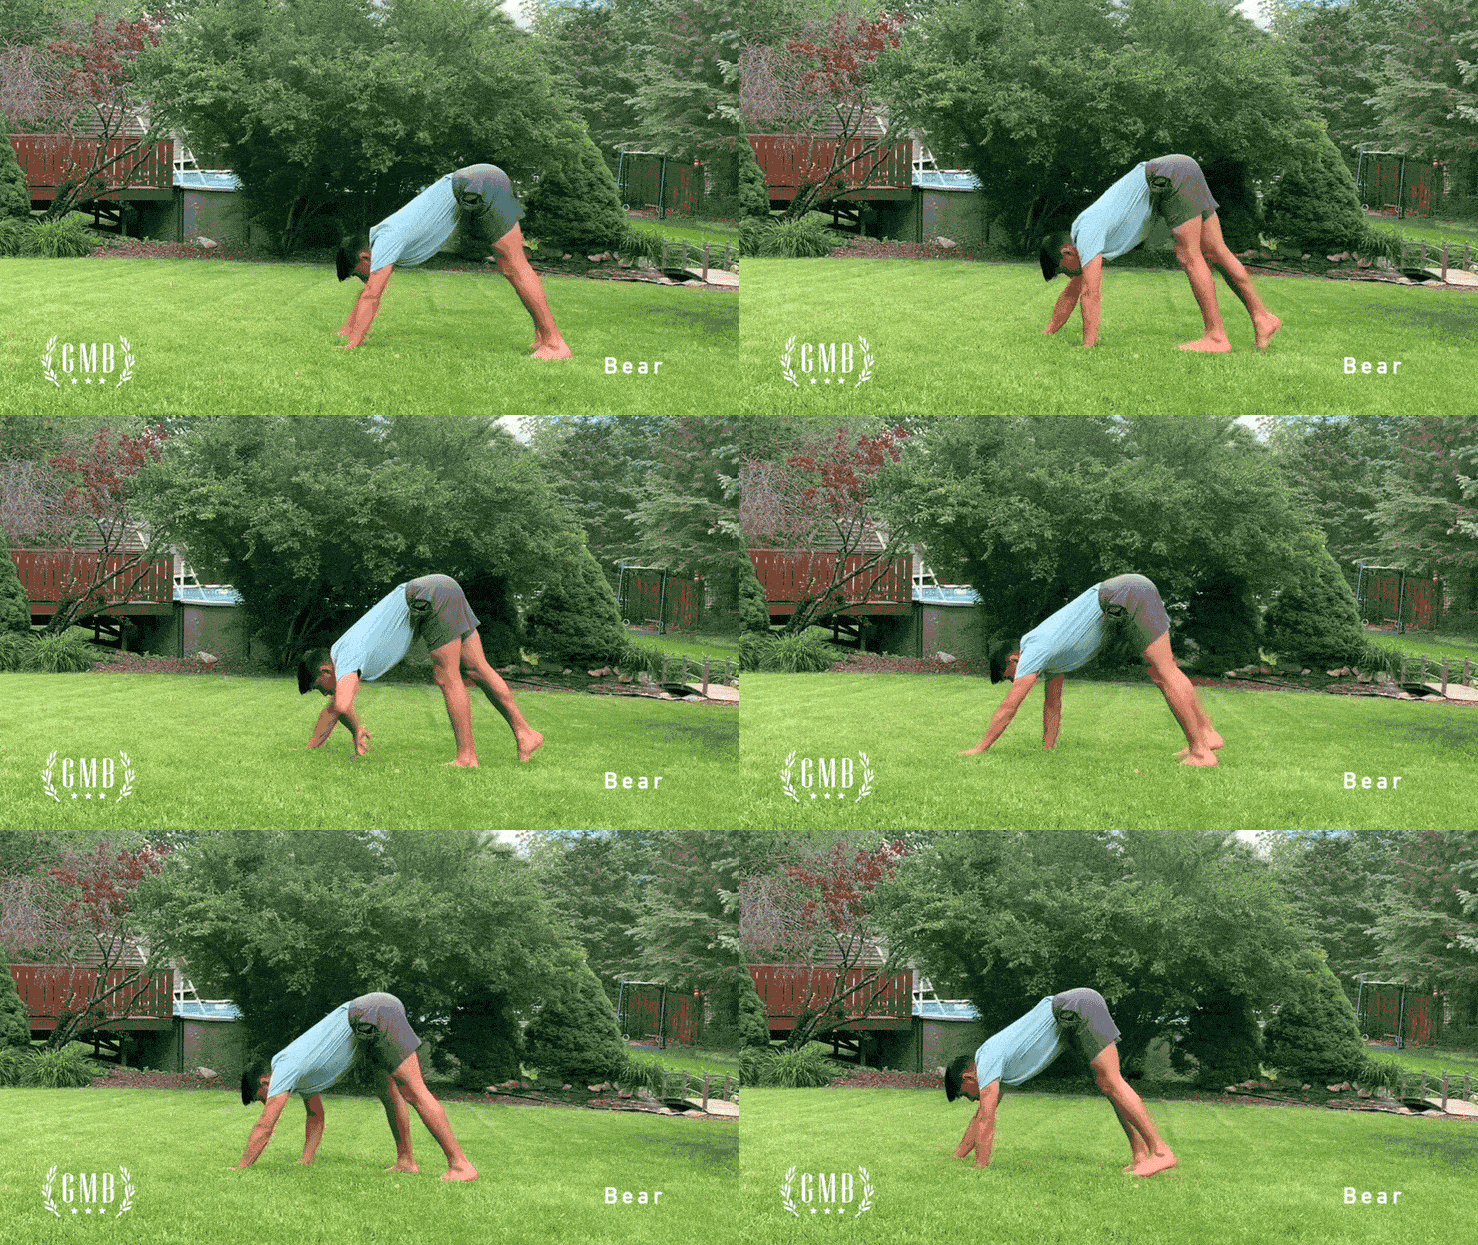
This movement is great for the overhead squat because it gets you used to the position and teaches you how to stabilize your bodyweight with your hands, which lends well to balancing a loaded barbell overhead.
If you’re new to the Bear, start by getting comfortable in the A-Frame position and holding it for time, anywhere from 10-30 seconds to start.
Notice the arms in the A-frame and how they’re in a similar place as they’d be in an overhead squat.
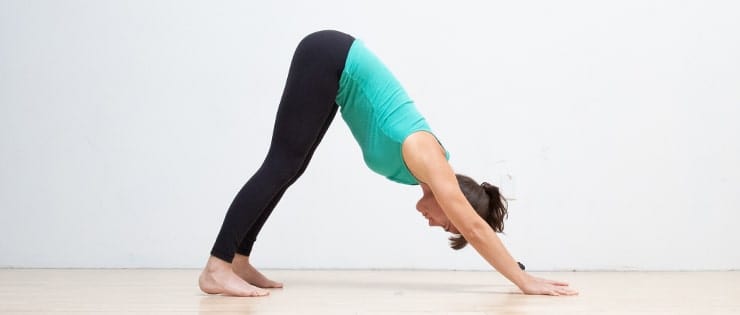
Getting into these positions regularly opens up your shoulders, chest, and upper back, which is exactly what you need for a solid overhead squat.
The way we use the Bear Walk in Elements is by setting a timer for 1-5 minutes and having you walk across the floor with good form doing as many reps you can get.
You’ll have to take some breaks at first, but as you practice the Bear, you’ll be able to walk around on all fours the entire time. And when you’re able to do this, your upper body mobility will be adequate for holding a barbell overhead.
Unlocking Full Body Mobility For The Overhead Squat
If you want to make steady improvements in full body mobility, we recommend a daily practice that you will stick to over the long term.
Increasing mobility in problem areas takes some effort, but it’s relatively easier to maintain once you’ve reached your goals. A lot of our clients supplement their current training with regular bodyweight work, using our Elements program on their off days or as a part of their warm-up.
Practical Flexibility For Deep Overhead Squats
Elements is a guided program you can do on your phone that helps you build strength, flexibility, and body control that translates to any athletic movement or sport.
*This article was written in cooperation with GMB Staffer, Sara Lessmann (CF L2, GMB Trainer)*


