You love watching gymnasts doing tumbling routines–who doesn’t?
It’s a beautiful demonstration of strength, coordination, dedication, and artistry. And to most people, especially if you don’t have a gymnastics background, it feels utterly impossible.
But tumbling doesn’t only mean back handsprings, roundoffs, and aerials.

For our purposes, tumbling just means maneuvering your body on and around the floor in a variety of ways, and it’s something everyone can benefit from, and anyone can learn.
In this tutorial, I’ll address some common fears, show you why tumbling is a good addition to your practice, and I’ll give you 3 basic tumbling moves to get you started. Plus, I’ll show you some combinations you can start working on, no matter what level you’re at.
In addition to working on the exercises in this article, our free Strength and Mobility Kickstart will help you get comfortable with moving around on the floor, allowing you to build better strength, mobility, and body control.
Why Learning How to Tumble is Important for Everyone
 When was the last time you did a somersault? For most adults, the answer is, “sometime around first grade.”
But part of why we even played with those movements at all during childhood is because we were learning how to control our bodies, and how to move them in the most creative and effective ways.
That need to engage our bodies with our surroundings doesn’t go away just because we hit adulthood.
After all, you engage with your surroundings every day, whether or not you try. If you’re more comfortable engaging in different ways, you’ll be better able to absorb unwanted impacts if and when they happen.
There’s a good chance you have no aspirations to start practicing high level gymnastic moves (if you do, that’s awesome!), but any form of tumbling–from the most basic cartwheel to the most advanced 720º turn–involves some serious body awareness and control, especially when the emphasis is on “making it pretty.”
When you practice even the most basic tumbling movements, you’ll improve your body awareness and control much more quickly than you might think.
If you’re anything like most adults, your body awareness and control are severely lacking–simply because it’s not something most people train specifically. (We talk about this in more detail in this related article).
Poor body control means you’ll have a harder time learning the skills you want, or using your body in the way you need to. The basic tumbling movements we’ll cover in this article will be a good start to better movement.
“But, tumbling looks really scary!” (Here are some fear-reducing tumbling tips for beginners)
Even the most basic tumbling skills can look really scary if you haven’t practiced them before.
People think they’re going to hurt their neck or back doing rolls, or that they’ll fall when doing various turns and flips. And being upside down can be totally disconcerting if you’re new to it.

Don’t worry, there are some simple ways to get past those fears.
Plus, the movements I’ll show you in the next section should allay your fears–I specifically chose variations that are approachable and not scary in the least.
But here are some tips to keep in mind before we get into the movements.
Take it Slow While Learning Tumbling Techniques
 Probably the most common issue is the very normal anxiety and fear when learning a new skill.
And it can certainly be magnified when you have to assume positions that resemble falling! If you aren’t used to having your head at certain angles, along with the added pressure on the head the skills may generate, you and your body can interpret it as a dangerous thing.
The trick to getting past this anxiety is to take things slow, and break the new movements into manageable steps.
Work through each step deliberately and with good control and you’ll diminish your fear. Go too fast and try to just barrel through it, and you may get injured and further reinforce that fear.
Take your time, work though the skill with good technique, and you’ll progress much faster.
Pay Attention to Where Your Head is During Training
 When working through basic tumbling such as rolls and cartwheels, it’s very important to know where your head is in space and in relation to your body. It’s crucial both for safety and for proper performance of the movement.
For example, your head position for rolling should be with your chin tucked in tight to your chest as you go upside down into and coming out of the roll.
This tucked chin position protects your neck from undue pressure and strain.
As you progress to more advanced tumbling movements, such as aerials and back and front flips, head position can determine whether you complete the move or fall on your face!
Be Mindful of Your Space While Performing Tumbling Moves
 This may be obvious, but I’ll say it anyway. You’ll need a nice, clear area to practice. Remove all clutter and allow more room than you think you need.
In the beginning, when you are first figuring out what to do, this is especially important. Chances are, your body will be all over the place and your sense of direction and spatial awareness will not be as sharp.
Please take that into consideration when you pick a training area to work on these new moves. As you improve and you become very comfortable in your technique you won’t need as much space. As an example, take a look at this incredible video of a movement master aware of both his body and his surroundings.
Of course, just starting out, you won’t be able to move in such a tight space like that, but it’s something to strive for.
The Most Important Tumbling Movements Beginners Need to Learn
There are all sorts of fancy tumbling skills, and maybe you’ll want to work toward those down the line. But, just like anything, you’ve got to start with the basics. The movements I’m going to show you are the most important for you to learn, and they provide a foundation for more advanced skills down the line.
- Forward and backward rolls can be quite intimidating, but the variations you’ll learn here emphasize rolling on your shoulder rather than on your head or neck.
- I’ll also show you some cartwheel variations that you can work on, no matter what level you’re starting from.
- And finally, I’ll show you some combinations you can start playing with at different levels
In addition to working on the exercises in this article, our free Strength and Mobility Kickstart will help you get comfortable with moving around on the floor, allowing you to build better strength, mobility, and body control.
Let’s review the most important details for these movements:
Forward Shoulder Roll for Beginners
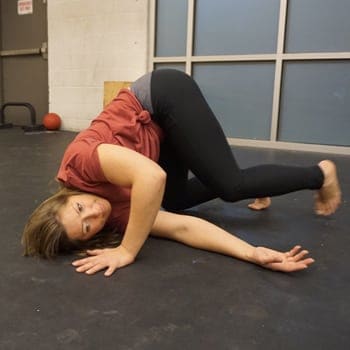
 This variation is a bit different from the typical front roll you might see, which tends to place a lot of pressure on the head and neck. The forward shoulder roll takes the head and neck out of the equation so that you can move more freely.
- Start by staying as close to the ground as possible (you’ll work your way up over time).
- Make sure your head makes minimal contact with the ground. Extend your arm and roll onto the back of the shoulder, tucking the head through the other arm.
- Lift the opposite knee as you do this, lifting the butt slightly up into the air.
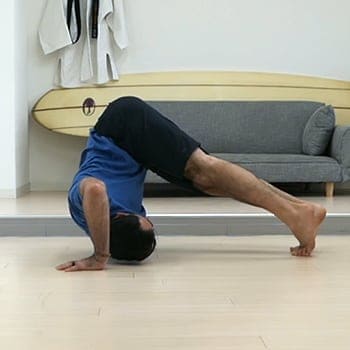
- Once you’re comfortable getting into and out of this position, you can start working on straightening your legs, lifting your butt even higher in the air. Don’t actually roll just yet, though!
- After practicing that for a while, rather than letting yourself fall through, walk your toes forward, coming onto the back of both shoulders.
Over time, you’ll be able to speed this up while maintaining your control.
How to Do a Backward Shoulder Roll
 Similarly to the forward shoulder roll, the backward variation has minimal head and neck involvement, and focuses instead on rolling on the shoulders.
- Start by rolling to your side, by bringing your leg out to the side and watching your toes, with your arm extended.
- Next, roll to the side and then walk your feet around to the back.
- Finally, you can work on rolling straight backward, but make sure you’re rolling on your shoulder and not your neck, tucking your head under your other arm as you roll backward.
Once you’re comfortable with the forward and backward shoulder rolls, you can start combining them by rolling forward and then immediately backward, and vice versa. This will help you get a lot of good practice in.
How to Learn to Do a Cartwheel
 The cartwheel is one of my favorite movements to teach. It’s so much fun, and there’s a lot more to it than most people think. By breaking it down the way we do in this tutorial, you’ll learn better control while removing any fear factor that may be there for you.
- For the first variation, place your hands on an imaginary line, facing the same direction. Then step your feet at an angle from one side of your hands to the other side of your hands.
- Next, start from a squat, placing your hands next to you, reaching far across with the opposite arm. Then, hop your feet over to land at an angle from your hands. Over time, you can work on pushing into the ground to extend the legs up overhead.
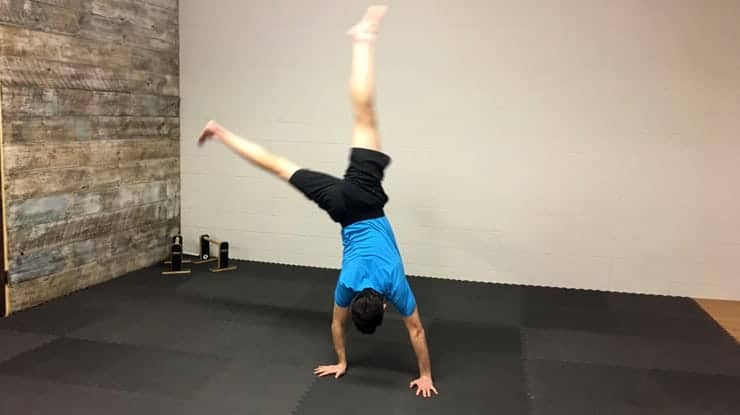
- Now, you’ll start from standing. Place your hands down as you push off the front leg and lift the back leg into the air. Work on this push and lift until you are comfortable letting your legs follow you.
- Next, we’ll work on a slightly different type of cartwheel. Start from a squat and reach behind you, then rotate and twist your feet, then hop your feet over. You can work on smoothing this out over time.
- Finally, I show the gymnastic cartwheel, which is a more classic variation of the full cartwheel. This variation, which starts from standing, has you work on bringing your legs up all the way and focus on getting some float time.
Our full cartwheel tutorial will give you some more details on how to work up to a full cartwheel, but the variations I just showed you will help you get started.
Beginner Tumbling Skills Combination
 Once you’ve had a chance to practice those 3 basic movements, you can start playing with combinations. In the video, I show a couple of options for combinations. Here are some key tips for the basic and intermediate versions.
- The primary focus with any level of combinations is to “make it pretty,” focusing on making your movements as smooth as possible.
- As you progress, you can work on moving through the combinations without pausing between movements. That ability will come with time and practice.
- You can also work on slowing down your movements, really focusing on control.
The specific combinations I show are just examples. Take this as an opportunity to play with some different combinations–whatever feels good!
Tumbling Training FAQs
Since tumbling is so foreign to most people, we hear a lot of questions and concerns, which I’ll address below. For more FAQs, check out this podcast episode we did on the subject.
I feel dizzy/nauseated when I practice tumbling exercises. What should I do?
This issue comes up quite a bit and for the majority of people, it comes down to simply not being used to moving like this.
We spend most of our days upright with our head up, or lying down with our head horizontal. Not too many of us whip our heads around in our day jobs! So this is a new thing that takes some time to get used to, perhaps a couple of weeks or more.
Take it slow and take longer rest breaks between trials of the move.
Don’t go beyond the point of mild nausea, and let the feeling subside fully before doing the next rep. If it doesn’t go away, then call it a day and try again.
Now there may be some of you that have a history of vertigo, or other inner ear issues, and the dizziness/nausea may be intractable. Please check with your health care provider to see what is best for you.
Isn't rolling on your spine super dangerous?!?!
In a word: No.
(But starting with the variations I showed you above won’t put much pressure on your spine anyway).
Take it slow, work on your technique, and improve your flexibility to get in the best positions for these moves. Your spine will not only be okay, it’ll be the better for it.
Do I need special mats for tumbling?
Again: No.
While proper gymnastic mats are a joy to roll on, you don’t need them to start practicing. Grass and carpet are just fine. Perhaps hardwood flooring and concrete aren’t the best for beginners, but you don’t need to buy special and expensive mats to work on these basic skills.
Improve Your Body Awareness with Basic Tumbling Techniques
 The best reason to work on tumbling isn’t to do awesome tricks–though that can be nice–but rather, to use these great movements to improve your coordination and your understanding of your body as it moves through space.
Because it isn’t really a normal thing to flip upside down and back up again, or to spin and twist in the course of a regular day, these basic tumbling moves are a potent way to stimulate and invigorate our bodies and minds. And very quickly, you’ll have created a new body that you can use to explore and enjoy movement.
A great way to start incorporating tumbling and other similar ways of moving into your routine is with our Elements program.
It develops your coordination and body awareness through exploration of core movement patterns. By the end of the program you’ll be moving better with more control of your body than ever.
Boost Your Overall Movement Ability
With Elements, you’ll learn to move better by exploring movements in a safe, structured practice. In just a few minutes a day you’ll move with more precision and confidence in any activity.


